Whole Wheat Cookies Stuffed with Dulce de Leche

Happy New Year!

How were everyone’s holidays?!

I hope that they full of lots of family, friends, love, excitement—now let’s make 2017 even better than last!

Ohh 2016, you were quite a sassy little thing weren’t you, so moody, yet so wonderful. While there were many ups and downs, full of pounds of butter and sugar and chocolate chips, some loss, lots of growth and gain, quite a few running blisters, a wedding, a move, a new puppy, some really tough moments, followed by many unbelievably beautiful ones…I’d say 2016 is a year that will never be forgotten.

But the obvious question here: are y’all big New Year Resolution people?!

I used to be, always the normal “go to the gym more often,” “eat more whole foods,” “be more positive.” But I’ve slowly strayed away from that and moved more into the self-love: respecting yourself and your body, finding happiness, etc. One huge thing that I learned over the last year was that you can’t always control what happens, but you can control how your react to it, which is how I try and stay most centered.

So there. Voilà. My updated life outlook!

Along with that, baking will always be my most relaxing activity…I mean unless you want to include cuddling on the couch the pup and Roberto an activity…

I want this year to include a lot more wild experiments in the kitchen, whether it’s testing a recipe 500 times, or seeing how huge I can make a cookie and what silly thing I can stuff it with next, or how tall I can stack a cake, who knows—there will be no fear this year!

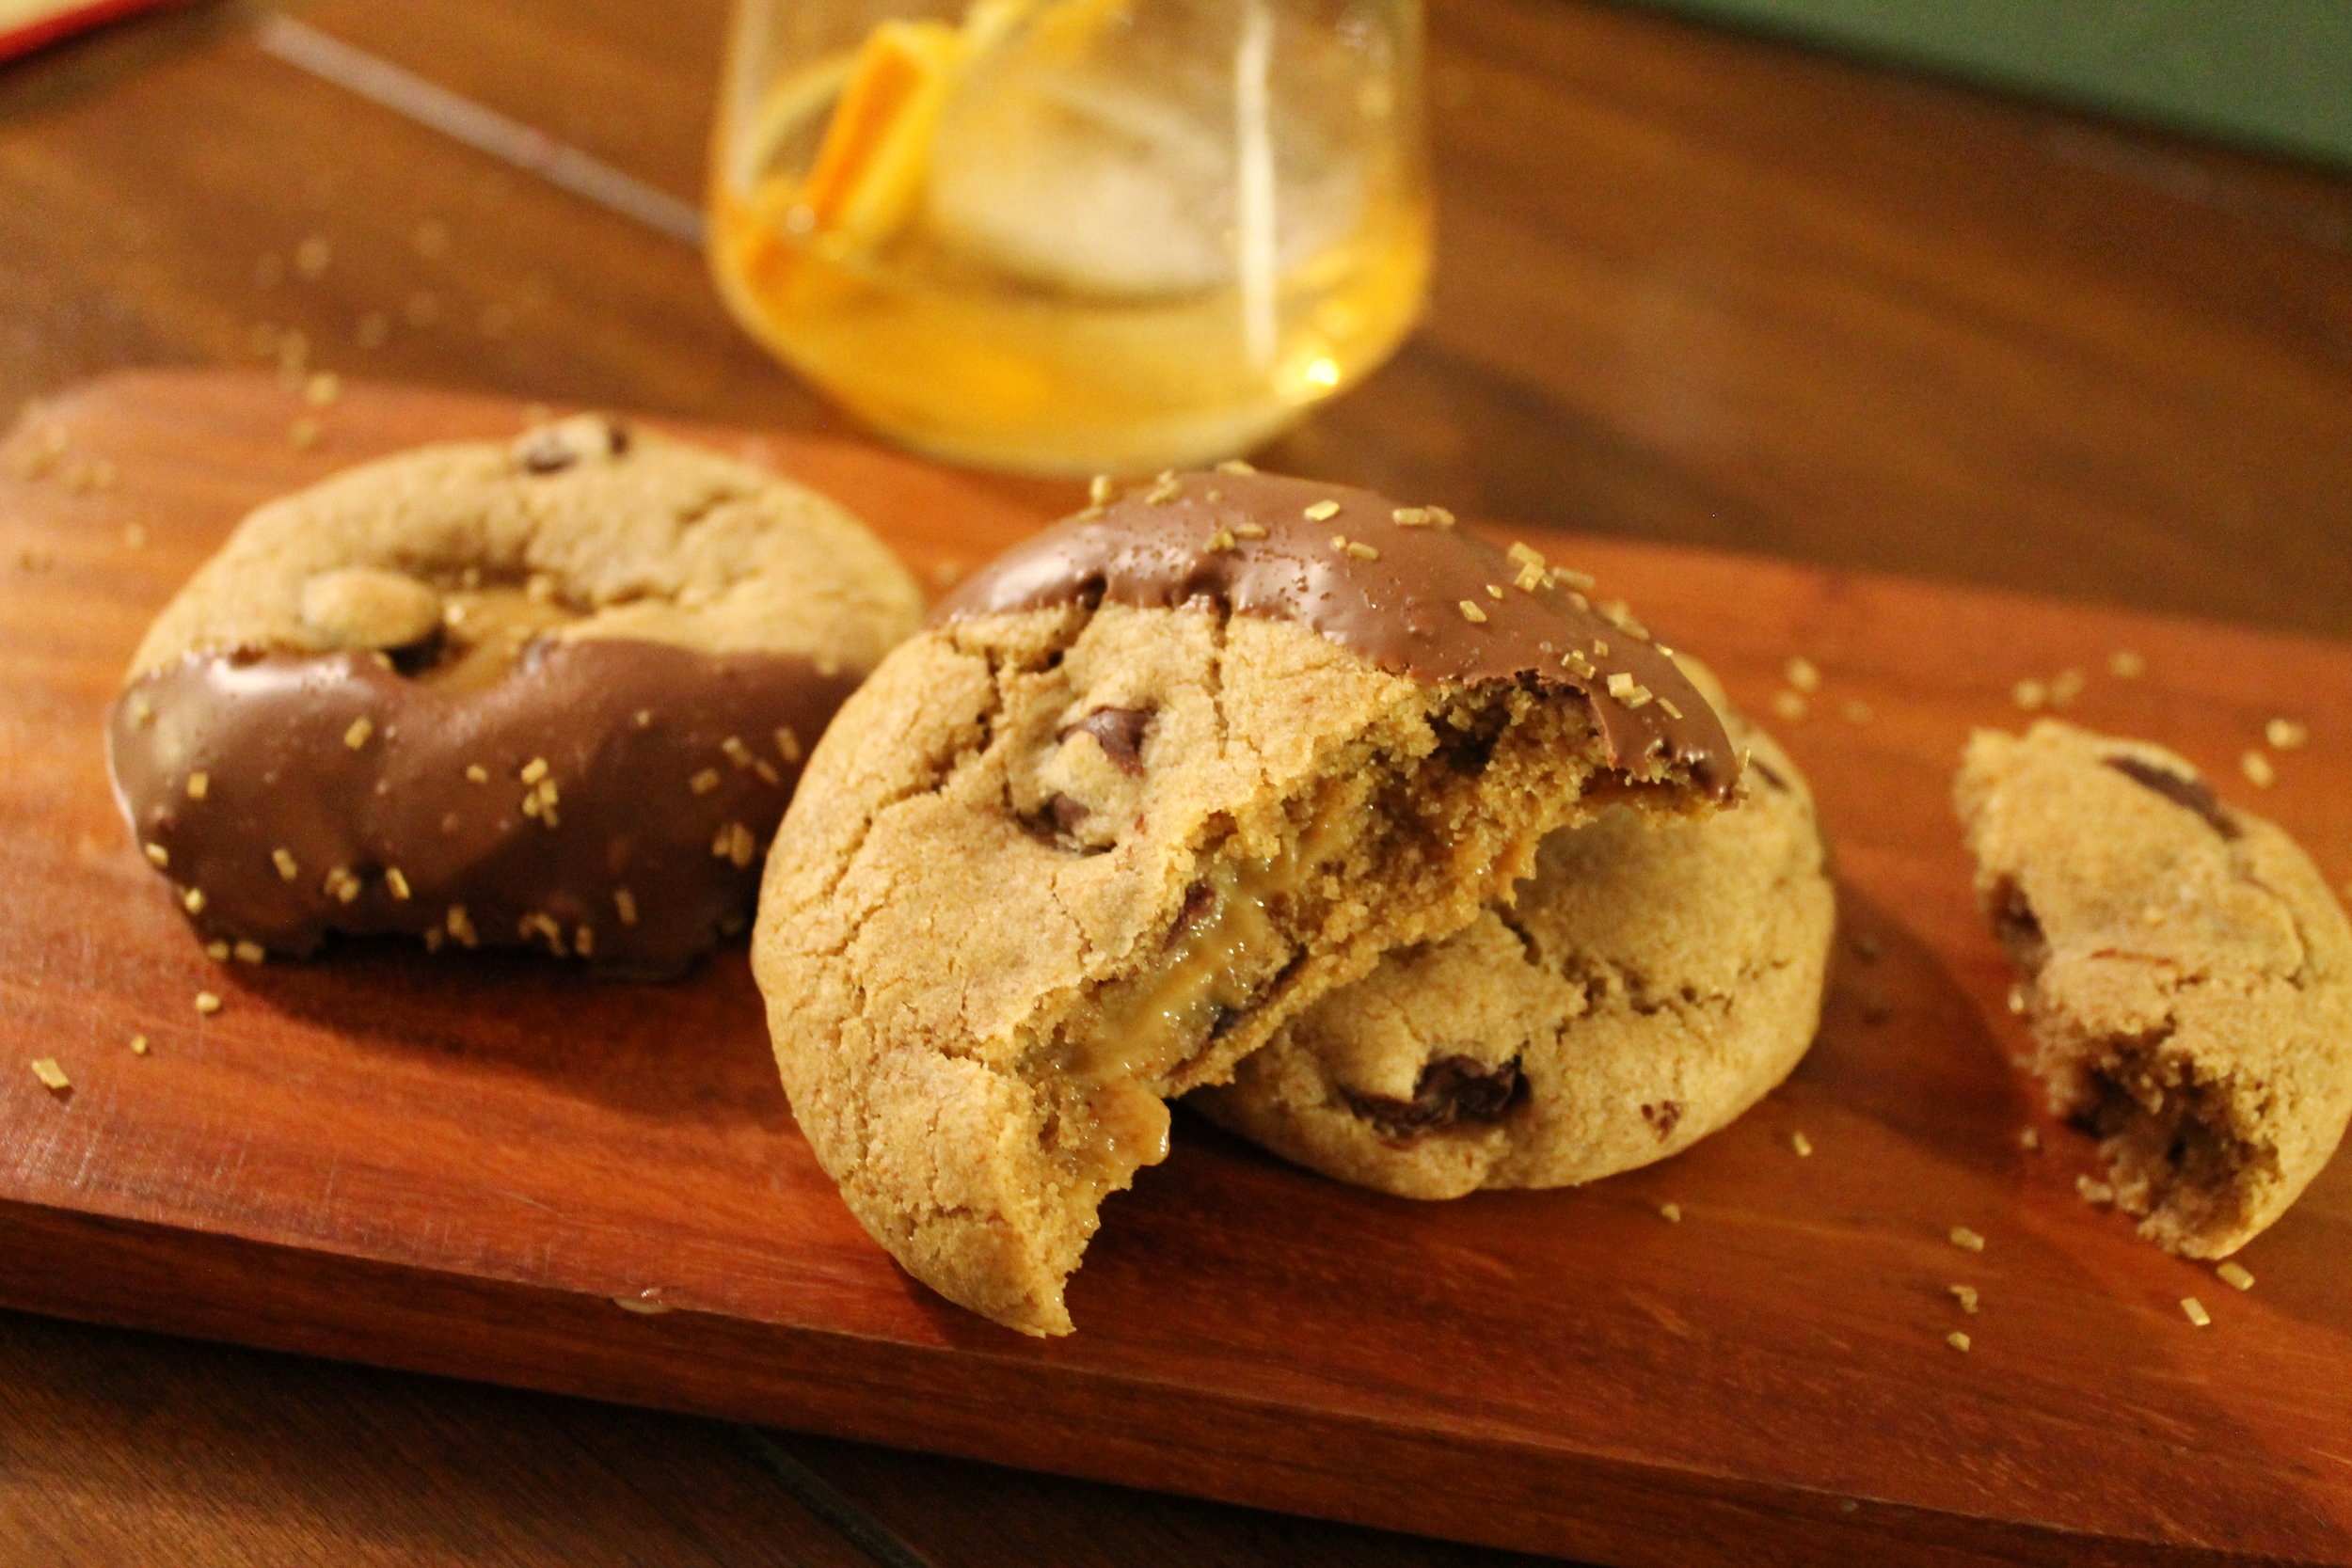
The first recipe of 2017 is a more simple one, slightly healthy (what’s up, whole wheat flour?!), but also packed full of homemade dulce de leche and dipped in chocolate…so nevermind with the H word.

As you know, I get random cravings, then I need to get into the kitchen and just bake until they are satisfied! Remember the caramel corn? All started with my need to go to an amusement park…sometimes I even surprise myself… Anyways! This recipe was exactly that: I wanted something salty dipped in chocolate, and a pretzel or a chip just wouldn’t do! Then it was something like oh, a cookie? But hmm, I bet it would be great stuffed with caramel, so let’s make dulce de leche! But still, hello, where’s the covered-in-chocolate part?! Right, a cookie, with all sorts of chocolate chips, a gooey inside, dipped in milk chocolate, sprinkled with salt, AND SPRINKLES!

Oh. Whole wheat flour for a slightly different taste, texture and maybe added nutrients?! It is the New Year isn’t it?           

It’s always fun to read my ridiculous thoughts, isn’t it? I did happen to bring a test batch of these cookies (that’s 30 of them…) to a relatively intimate NYE party, and they were all eaten! So, if that’s not proof that these are addicting and delicious, go grab a bottle of Champagne, then you’ll definitely be convinced!


ingredients

Butter (room temperature)—12 oz, or 3 sticks

Brown Sugar—12 oz, or 1 ½ C

White Sugar—4 oz, or ½ C

Eggs—3

Vanilla—2 tsp

Baking Soda—1 tsp

Salt—2 tsp

Whole Wheat Flour—17.5 oz, or 3 C

AP Flour—10.25 oz, or 2 C

Chocolate Chips—14 oz, or 2 C

Dulce de Leche—recipe here

Milk Chocolate Chips (melted)—2 cups


process

In the bowl of your mixer, cream together the butter and both sugars until light and fluffy.

Scrape down the sides of your bowl.

Add in the eggs and vanilla, mix until combined.

In a separate bowl, sift the flours, baking soda and salt.

With the mixer on low, slowly add in the dry ingredients.

Add in your chocolate chips.

Mix until all is combined.

Wrap the cookie dough in plastic wrap and allow to chill for at least an hour or two, until it has firmed up a bit.

While the dough is chilling, you can make your dulce de leche sauce—found here! This will take between 2-3 hours, so it’s a great time to get it done!


When you are ready to bake your cookies, preheat your oven to 350˚F.

By this time, your dough should have firmed up, and your dulce de leche should be finished and cooled.

Make dough balls that are about 1 oz, which is around a tablespoon—this can be eyeballed!

Flatten them out and make them into little “bowls” so that the filling will have a nice place to sit.

Put about a ½ tsp of dulce de leche in the middle.

Take another ball that is the same size, flatten and make another bowl out of it, this will be the top to your filled bottom cookie bowls.

Cover the filling with this second flattened piece, press the edges so that it seals in the dulce de leche, and then gently roll it in your hands so it makes a completely closed cookie dough ball.

This is one!

Do this with the remainder of your cookie dough and filling.

Bake in the oven for about 20 minutes, rotating the pan halfway through.

It will be hard to tell when they are finished baking due to the color of the whole wheat flour, but they should be completely set on the edges and just slightly underbaked in the centers.

Allow to cool completely before dipping them in chocolate!


To make the chocolate for dipping, make a double boiler and melt about 2 cups of chocolate chips.

When the chocolate is completely melted and smooth, remove from the heat (make sure to wipe the bottom of the bowl to remove any of the warm water!), and dip each cooled cookie about halfway with chocolate.

Before the chocolate sets, sprinkle with just a little bit of salt and some sprinkles for extra color, crunch and excitement!

Whether or not you allow to chocolate to cool and set entirely…


Bon Appétit!

Whole Wheat Carrot Blueberry Muffins

Happy second week of January!

How is it already the 11th? When did this month decide to sneak up on us? January is almost at its halfway point—totally not ready for that my friends!

With the first week back at work under my belt, my craving for anything dipped in chocolate and covered in candy canes (more or less) gone, I have had this inspiring “I can take on the world” attitude for the last 10 days. I am pretty sure it is partly the fault of these insanely healthy muffins.

I am not throwing some super fibery, possibly too dry, bran muffins at you BUT even better—blueberries, carrots, whole wheat flour, oodles of spice, and so many healthy fats. What else makes these pretty damn perfect? The fact that there is 3g of protein in each muffin. Yes. In. Each. Muffin.

Did I mention that they taste like a carrot cake? The moistness (…favorite word) of this muffin is unbeatable and the fact that there is whole-wheat flour, chia seeds and coconut oil as well makes them not only hearty, but also filling and good for you!

Like, where have these been all of my life?!

Did I mention that this whole New Year, New You thing has totally become my new mantra? I am always making way too many resolutions come January 1st, but instead, I figure if I am actively trying to better myself, that covers every resolution base. Whether that means eating a few more spinach leaves each day, reading one more chapter in my book, testing 4 recipes a week as opposed to 3, or just spending less time obsessing over social media and more time driving my fiancé crazy by singing Justin Bieber at the top of my lungs—this year will be the best, most positive year yet!

So yes, please throw me a super green smoothie with a side of these Whole-Wheat Carrot Blueberry Muffins and I know that I can really do anything!

ingredients

AP Flour—1.5 oz, or ¼ C

Whole Wheat Flour—10.5 oz, or 1 ¾ C

Baking Soda—0.5 oz, or 2 tsp

Salt—½ tsp

Cinnamon—0.3 oz, or 2 tsp

Nutmeg—1 tsp

Chia Seeds—0.5 oz, or 1 TBL

Coconut Milk—2 oz, or 4 TBL

Coconut Oil (melted)—3.5 oz, or ½ C

Eggs—3

Brown Sugar—5 oz, or 2/3 C

Maple Syrup—1 oz, or 2 TBL

Vanilla Extract—1 tsp

Carrots (grated)—4.5 oz, or 1 ½ C

Blueberries—8 oz, or 1 ½ C


process

Preheat your oven to 425˚ F.

In a bowl, combine the flours, baking soda, salt, cinnamon, nutmeg and chia seeds.

Mix.

In a separate bowl, combine the coconut milk, eggs, brown sugar, maple syrup and vanilla. Whisk together.

Slowly pour the wet ingredients into the dry and fold together.

Once combined, add in the melted coconut oil.

Fold in your grated carrots and blueberries.

Line your muffin tin with muffin papers, or simply spray with nonstick spray.

Fill up each cup with muffin batter about ¾ of the way full, making sure to get plenty of berries in each one!

Sprinkle a little bit of brown sugar on top of each muffin—this will caramelize and add a slight crunch to the top of your muffins.

Place in the oven for 5 minutes, and then turn your oven temperature down to 345˚F and bake for an additional 15-17 minutes, until the tops of the muffins spring back slightly when touched, or when a toothpick comes out clean.

Remove from the oven and allow to cool for a few minutes before taking them out of the pan.

Enjoy on their own, toasted, with a bit of jam on them, whatever you need to give you an extra boost for the day!

Yield—18-20 muffins

Bon Appétit!

Overnight Brown Sugar Bacon Cinnamon Rolls

IMG_6130.JPG

As Christmas approaches, my need for buttery, gooey breakfast pastries skyrockets. Between croissants, morning buns, pain au chocolate, cinnamon rolls, an unhealthy amount is consumed. Maybe it’s because while I am home for a few days, I need to get my Standard Baking Company fix, or that because I make sticky buns each year for Christmas morning, I just feel the need to carbo-load for weeks in advance. Whatever the reason, I had the urge to welcome a new cinnamon roll into our family!

The other night while Roberto and I were enjoying our bi-weekly pizza Friday, I started daydreaming about cinnamon rolls. Like, they literally took over every thought of mine. Gingerbread rolls? Toasted oat rolls? Apple butter filling? Brown sugar bacon rolls?! We have a winner!

How had I never thought of this before? The smell of bacon just screams breakfast, plus it’s extra yummy when coated in cinnamon sugar and wrapped in a cozy, buttery dough. Besides, I figure if you’re going to go all out with breakfast, especially on Christmas morning, a little bacon never hurt anyone—even throw in a few mimosas and possibly a gingerbread cookie while you’re at it!

This recipe starts with a very simple yeast dough—flour, milk, yeast, some sugar. Plus you will, most likely, have all of the ingredients in your pantry already! What else is so great? This should be started the night before you want to serve them, so take a couple of hours out of your day, prep the rolls, stick them in the fridge, and violà! The next morning you just have to pull them out of the refrigerator, let them come to room temperature and bake away!

So, while sticky buns may have been the tradition for the past few years on Christmas morning, I think that these cinnamon rolls may be taking the lead this year. A little less butter, a little more bacon, and a lot more love to surround you and yours on Christmas day!

Luckily, my first wedding dress fitting is the day after Christmas; I hope they can wiggle me into it!

dough ingredients

Milk (110-115˚F)—4 oz, or ½ C

Molasses—1.5 oz, or 2 TBL

Sugar—4 oz, or ½ C

Yeast—0.25 oz, or 1 TBL

Butter, softened—4 oz, or ½ C

Eggs, beaten—2

Milk—4 oz, or ½ C

Flour—17.5 oz-20 oz, or 3 ½-4 C


dough process

In the bowl of your stand mixer, combine the warm milk, sugar, molasses and yeast.

Mix just to combine, and allow this to sit for about 10 minutes.

The yeast will begin to activate and become foamy—if not, then you have either not made the milk warm enough, so the yeast will take slightly longer, or you have overheated your milk, killing the yeast and you will have to start again!

After the 10 minutes, attach the dough hook to your mixer, and add in the eggs, butter and second milk. Mix.

With your mixer on low, slowly add in the flour.

Mix for 10 minutes on medium speed. This will really knead your dough and give it the wonderfully soft texture that you will soon taste!

After the 10 minutes, if your dough is too sticky to handle, add in a Tablespoon at a time more flour.

It is okay if this dough is slightly stickier than most yeast dough that you make, but if it’s really stuck to the sides of the bowl, more flour will be needed!

Transfer your dough to a well-oiled bowl.

Cover with plastic wrap and place in a warm room so that it can double in size—about 2 hours.

While this is happening, you may prep your filling below!


filling ingredients

Bacon, cooked—½#

Brown Sugar—6 oz, or 1 C

Butter, softened—5.5 oz, or 2/3 C

Cinnamon—1 oz, or 2 ½ TBL

Nutmeg—½ tsp

Allspice—½ tsp


filling process

In the bowl of your mixer, combine the butter and brown sugar.

Once smooth, add in the spices.


When you are ready to make the rolls, take your risen dough and put on a well floured surface.

Knead just slightly with your hands.

Roll into a large, 10” x 24” rectangle.

Spread the filling all over the rolled dough.

Sprinkle the bacon evenly on top.

Starting from the bottom, roll upwards, very tightly.

Cut into about 2” thick slices.

Place into a well-buttered baking dish.

Cover tightly with plastic wrap and stick in the refrigerator overnight to rise again.

If you are looking to make these the same day, you can let them rise out of the fridge.

The next morning, when you are ready to bake these for breakfast, take out of the refrigerator, and bring to room temperature.

If you preheat your oven to 250˚ F and let your rolls sit on top of the oven, they will warm up faster before you bake them!

When they are ready to be baked, bump your oven up to 375˚ F and bake for 25-30 minutes, until golden brown.

Remove from the oven, allow the cinnamon rolls to cool for just a few minutes, and then either top them all with the frosting recipe below, or serve and allow people to frost their own buns!


frosting ingredients

Butter, softened—2 oz, or ¼ C

Confectioner’s Sugar—4 oz, or ¾ C

Brown Sugar—2 oz, or ¼ C

Vanilla—1 tsp

Milk—0.5 oz, or 1 TBL


frosting process

Cream together the butter and sugars.

Once combined, add the vanilla and milk.

Frost the entire tray of cinnamon rolls, or serve on the side for everyone to take as much or as little frosting for their own roll!


Bon Appétit!

Caramel Stuffed Gingerbread Cookies

Happy Week Before Christmas!!

Now I know that everyone is making gingerbread houses, gingerbread men, ladies and dogs, but how about some stuffed gingerbread cookies?!

Yes. Stuffed I say, and it gets better. How about filling your cookies with lots and lots of caramel? How about some homemade dulce de leche?

Step aside my gingerbread people; you’ve got a new boss in town!

Ever since I was little, my mom would always make absolutely fabulous gingerbread houses, that we would then decorate incredbily hideous—covering them with every color gum drop, candy cane and chocolate—and then eventually give them to the animals a couple of weeks later so that they could, also, get a nice sugar rush. While the stress of building so many houses (now I believe we are at 10 each year!) is rather overwhelming the day before, come Christmas day when it’s time for the, now, Gingerbread House Contest, we all go crazy! One year my brother decorated it completely in cereal squares; my nieces and nephews usually make theirs the most functional; I like to just coat it in spicy cinnamon candy that I’ll later pick at all night as a snack.

The entire thing is a rather fabulous ordeal, and I would never want to give this tradition up for anything! The endless bowls of candy options and both my mom and I hysterical the day before when the roofs keep falling off lead me to keeping these cookies simple—yet packed with a cooked, sugary goodness!

I like to start with a very simple gingerbread cookie dough recipe. There is just the right amount of spiciness in this cookie, not anything too overpowering, so that you can truly taste each and every spice. While I could have coated these in some shiny white icing and glorious decorations, I decided to put that extra sweetness inside of the cookies!

Yes, like actually inside.

As you all know, keeping a jar of easy, homemade dulce de leche sauce in my fridge is as much a staple for me as are butter and eggs. It is oh so quick, and can be used in a multitude of recipes—like my Ginger Apple Cake, or Semifreddo, or even an insanely perfect topping for Apple Crisp!

Anyways, it also bakes just marvelously inside of these gingerbread cookies, adding just enough sweetness without giving anyone a toothache!

Do I sound old or what...

Don’t have dulce de leche? Want to sub caramels instead? Go for it! Homemade or store-bought works just fine—even chocolate fudge can make an excellent filling. Heck, you don’t even have to stuff these cookies, but I know you won’t regret it if you do!

Gingerbread people and houses will forever have a special place in my heart, and my tummy come Christmas night, but these Stuffed Gingerbread Cookies are a new tradition that I’m starting right now!

ingredients

Butter—8 oz, or 1 C

Brown Sugar—5.5 oz, or ¾ C

Molasses—3.25 oz, or 1/3 C

Eggs—2

Vanilla—0.1 oz, or 1 tsp

Flour—18 oz, or 3 2/3 C

Baking Soda—0.25 oz, or 1 ¼ tsp

Salt—0.15 oz, or ½ tsp

Cinnamon—1 tsp

Ginger—¾ tsp

Nutmeg—¾ tsp

Allspice—¼ tsp

Dulce de Leche—1 can, recipe shown here


process

Cream together the butter and sugar.

Once light and fluffy, add in the molasses.

Add in the eggs, one at a time, and the vanilla.

Sift together the dry ingredients: flour, baking soda, salt, cinnamon, ginger, nutmeg, and allspice.

Slowly add in the dry ingredients to your mixer.

Once the dough has formed, wrap it in plastic and allow to chill for about an hour.

When you’re ready to bake the cookies, preheat your oven to 350˚ F.

This is when it gets fun!

These cookies are delightful without a filling, but adding a caramel or dulce de leche brings them to a whole different level.

You may use store bought caramels, this dulce de leche recipe here, nutella, whatever your little tummy desires!

To fill the cookies: take two equal sized pieces of cookie dough (1 oz for me!), and roll into balls.

Take one of them and make into a small bowl, this is where you will put your caramel.

Take the second ball and make it flat, this will be a cover for your bowl.

Pinch the sides together to seal in your filling, roll to make a seamless ball.

Do this until you have used up all of the dough—should make around 15-18 cookies depending on what size you decide to make, as well as how much of the dough you eat!

Put your cookies on a pay that has been sprayed with nonstick spray, about 3x3, because the cookies will get rather large.

Bake for 13-15 minutes.

Remove from the oven and allow to cool for just a few minutes before eating for a gooey center.


Bon Appétit!

Peppermint Mocha Brownies

Happy Peppermint Mocha Season!

Oh, whoops, I mean Happy Holiday Season, of course!

How has everyone’s December been so far? Filled with love and candy canes? Blue, white, green and red twinkly lights and eggnog? Endless peppermint mocha lattés and adorable gift-wrap with snowmen on it?

As most of you know, if I could, I would celebrate this season all year long, Michael Bublé’s holiday album would be forever playing in my car, and I would have our Christmas tree up and lit 365/24/7! So, I guess I’m really in my prime for the next couple of weeks.

After returning from a long weekend in Miami for Art Basel and Roberto’s birthday with my favorite couple (and future sister-in-law!), I was ready to pack away the little rompers and bring out the super hip sweaters with fuzzy polar bears on them—but it happens to be 70˚ here this week, so I guess I’ll just overheat in my dress-sweater combo, while pretending that it’s blizzarding outside.

This all includes lot and lots of hot chocolate with a candy cane, some yummy stew made by my one and only, and peppermint mocha brownies!

Yes, I am excited for the first two, but who doesn’t love super fudgy, extra rich, mocha and minty brownies?! I have no clue—especially when they are topped with a sweet white chocolate glaze and basically a snowstorm of candy canes!

The small amount of flour in these brownies, and lots and lots of chocolate, allow them to become oh so gooey in the center, while the outside has a slightly crisp “shell.” If the combination of a smooth center, and an even creamier white chocolate glaze isn’t enough for you, how about the fact that there’s extra caffeine fun with coffee grounds mixed in! Yes, my sweet, cheery, latté loving friends, I have just made your dreams come true with this here dessert—basically an edible peppermint mocha. I don’t believe I can say it enough times, or with enough excitement!

Peppermint. Mocha. White Chocolate. Candy Canes. Brownies.

Please do yourself a favor and make these as soon as possible, because while I write this post, I’m already on my second…or maybe third…slice!

IMG_6011.JPG

ingredients

Butter—8 oz, or 1 C/2 sticks

Semi-Sweet Chocolate—4 oz

Candy Canes, crushed—3

Cocoa Powder—1 oz, or 1/3 C

Eggs—3

Sugar—14 oz, or 1 ¾ C

Coffee Grounds—0.2 oz, or 2 tsp

Vanilla Extract—0.1 oz, or ½ tsp

Peppermint Extract—0.1 oz, or ½ tsp

Flour—5.25 oz, or 1C + 1 TBL

Salt—0.1 oz, or ½ tsp

Baking Powder—0.1 oz, or ½ tsp

Sweetened Condensed Milk—7 oz, or ½ can, or 2/3 C

Butter—0.5 oz, or 1 TBL

White Chocolate—6 oz, or 1 C

Candy Canes, crushed—4 or 5


process

Preheat your oven to 350˚ F.

Over a double boiler, combine the butter, semi-sweet chocolate, cocoa powder and candy canes.

While that is melting, beat your eggs together, using the paddle attachment, or, if using your hands, a whisk, with the sugar and coffee grounds for 3-5 minutes, so that they are light and fluffy. This will help keep them from coagulating when you add in the warm chocolate.

Add in your two extracts.

In another bowl, sift together the flour, baking powder and salt.

Once your chocolate mixture has melted, slowly stream it into your beaten eggs with the mixer on low speed.

Add in your sifted, dry ingredients.

Only mix until combined.

Pour batter into a pan that has been sprayed with nonstick spray. I like to use a springform pan, which makes for much easier removal of the brownies when you’re ready to eat them!

Baking for 27-30 minutes, until the center is just slightly jiggly—this is what makes them fudgy!

Remove from the oven and allow to cool completely.

Once cooled, melt together the sweetened condensed milk, 1 TBL of butter, and white chocolate.

Pour over the cooled brownies and sprinkled with the 4 or 5 (or more!) crushed candy canes.

Allow to cool and harden, then cut and enjoy!


Bon Appétit!