The World's Best Pancakes

May you live with wonder, not worry; curiosity, not caution.
— Sjana Earp
IMG_0202.jpg
IMG_0204.jpg

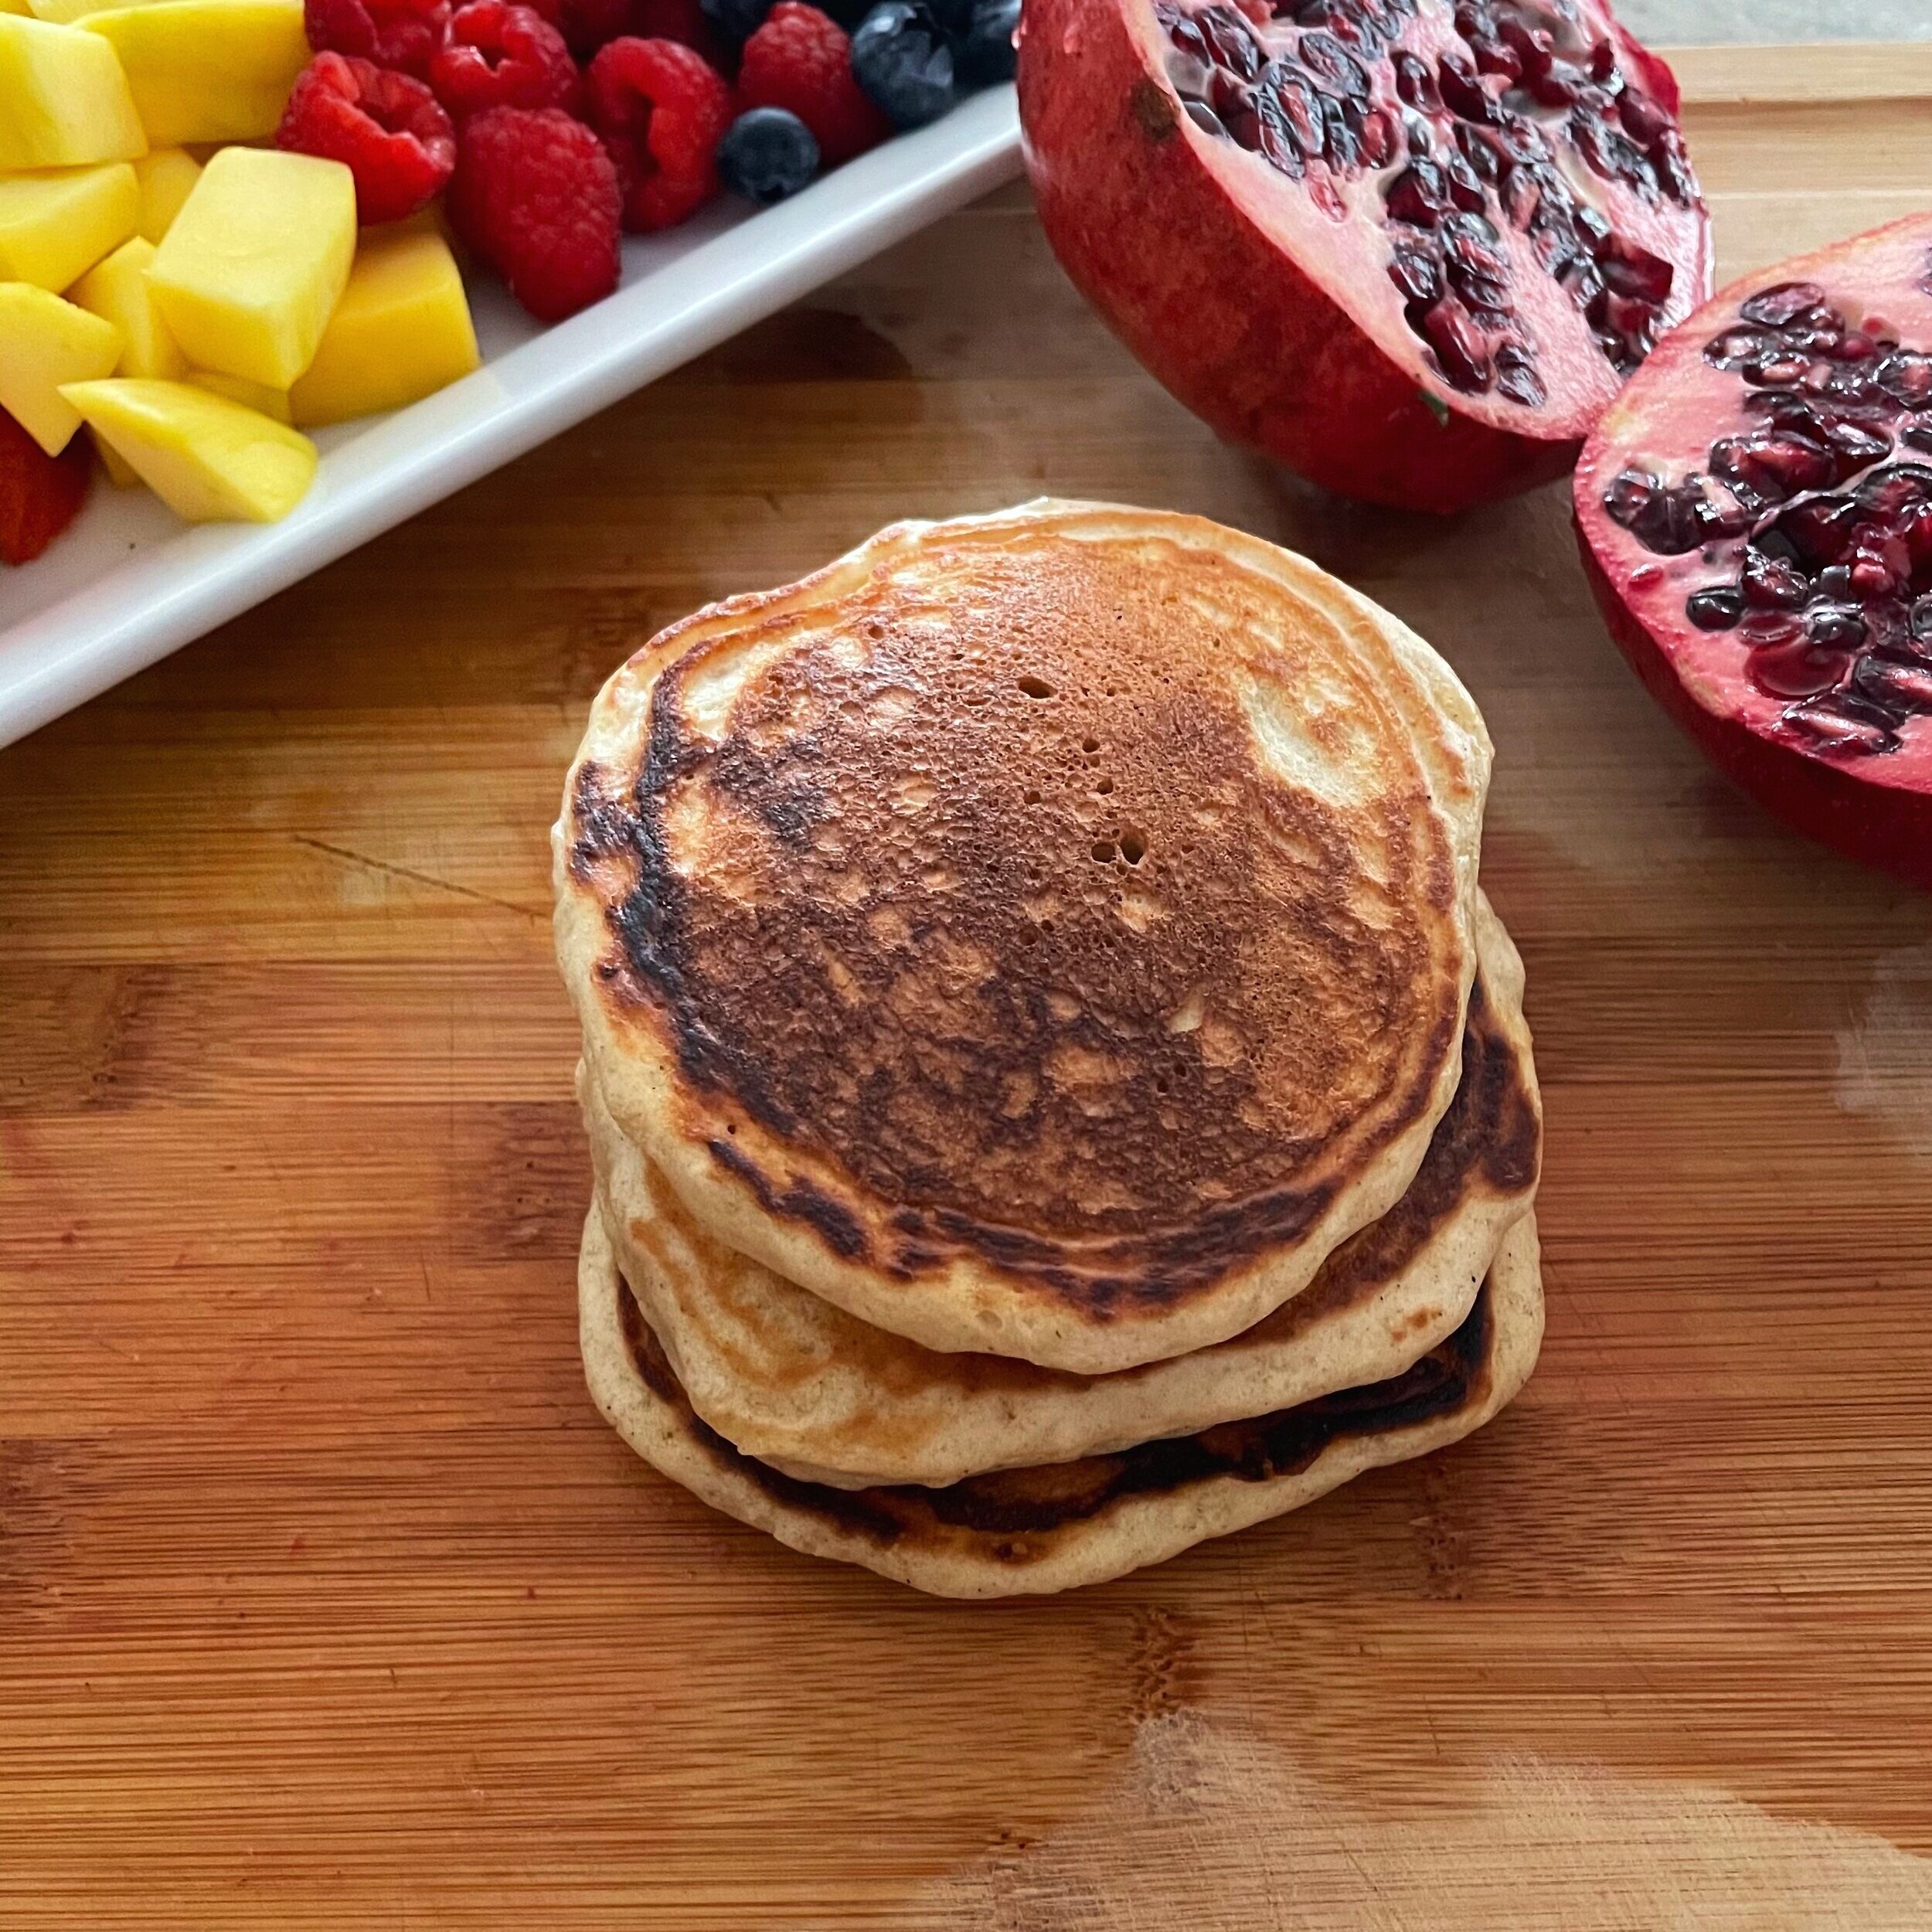
We started this little tradition during the middle of summer, when social distancing was in full effect, of making pancakes every Sunday! Something about this little sense of normalcy feels so dang good, and I want little O to have these fun memories!

That being said, pancakes have, surprisingly been something that I have struggled with for YEARS! For some reason I couldn’t get the ratios right, the heat on the pan right, there was just no consistency! It drove me insane. After way too many failed attempts at them, here we have what I deem the World’s Best Pancakes. EVER! They’re simple, quick to whip up (we all know how I feel about speedy recipes now with an on-the-go baby!), and taste SO good!

What do I love about these? The sugar can be subbed for any sweetener of choice, the milk is all up to you, the yogurt is optional, swap out the 2 eggs for a large banana, throw in a bunch of other spices, chocolate chips, etc., you do you!!! Some days, I don’t have yogurt on hand, so I just add in the same amount but in milk, and BOOM, it still works! Hence why they are called the World’s Best Pancakes.

I hope everyone can bring these delightful little pancakes into their lives today or next weekend, or even mid-week, and that they make you go mmmmm the entire time while eating them like Oliver does!


ingredients

Flour—10 oz, or 2 C

Coconut Sugar—¼ C, or 2oz

Salt—1 tsp

Cinnamon—2 tsp

Baking Powder—4 tsp

Eggs—2

(Oat) Milk—8 oz, or 1 C

Yogurt—¾ C, or 7 oz

Coconut Oil or Butter, melted—2 oz, or 4 TBL


process

In a large bowl, combine the flour, sugar, salt, cinnamon and baking powder.

Melt the oil of choice and set aside to cool slightly.

To the dry ingredients, add in your eggs, milk and yogurt. You can replace the yogurt with more milk if you’d like! I prefer the taste and texture with the added yogurt!

Fold in these ingredients until just incorporated.

Add in the butter.

Heat your griddle or pan over medium heat, add a small bit of coconut oil or spray to the pan.

Drop about ¼ C of batter onto the griddle.

Cook until little bubbles begin to pop up, then flip.

Cook for a few more minutes on the other side.

Reserve in a warmed oven until ready to eat!


Bon Appétit!

Spiced Squash Butter

Don’t be in such a rush to figure everything out. Embrace the unknown and let your life surprise you.
IMG_8975.jpg

Happy Fall, y’all!!

I wonder how many times I have opened up a fall blog post that way! I honestly just get so dang excited. I think a huge part of it is that I LOVE squash. Like, ugh why can’t they be in season all year long?! There are so many varieties and they all have unique tastes, are hella versatile, the list is endless.

Butternut—great for soups, roasted for salads, smoothies, pizza toppings, quiche

Pumpkin—pies, roasted, soups

Spaghetti—sautéed, roasted to use as a noodle replacement

Kabocha (newly discovered!)—roasted for grain and salad bowls, mashed

Acorn—same as above and, now, as SQUASH BUTTER!


Of course, there are so many more that I didn’t mention, gosh like delicata (YUM), the list goes on! So, with fall comes squash, and with squash comes my excitement to experiment with new recipes. I decided to change things up with the normal apple or pumpkin butters that are made during this beautiful season and see if acorn squash would do the trick! And dang, is it GOOD. It’s super simple and quick (ish) to make, and the spices can be adjusted to your liking, which I love about squash in particular. This recipe is heavy on the spices—so beware!! but that’s what makes it soooooo delicious. If you love apple pie and all of its spices, this is like 10x the goodness!

It gets better. I couldn’t just leave it at the squash butter without thinking about what I would slather it on! The warm and wonderful Siete Foods family sent me this lovely package of cassava flour burritos + some other goodies, so I instantly was like “Uhhh this squash butter is going inside of these burritos, DUH!” So, I made this cute little breakfast burrito with eggs + apples + greens + squash butter! And seriously, don’t knock it until you’ve tried it…it’s such a nice blend of flavors, a little sweet and a little savory yet a LOT of yumminess! I cannot wait until you try this combination for the most perfect start to your crisp, fall mornings!

IMG_5350.jpg
IMG_5354.jpg
IMG_8960.jpg
IMG_8972.jpg
IMG_8973.jpg
IMG_8975.jpg


ingredients

Acorn Squash, roasted—14 oz, or 2 C; medium in size

Coconut Sugar—3 oz, or ½ C

Honey—2 TBL

Water—2 oz, or ¼ C

Lemon Juice—2 TBL

Cinnamon—1 TBL

Nutmeg—2 tsp

Cloves—2 tsp

Salt—½ tsp


process

To roast the squash: preheat your oven to 425˚F

Cut squash in half, lengthwise, scoop out the seeds and drizzle a little bit of olive oil on top, sprinkle with salt

Place on a baking sheet skin side down

Roast for 45 minutes-1 hour depending on size

Will know when it is finished as the squash will be soft enough for a knife to go in and come out easily

For butter: once the squash has cooled for about 15-30 minutes, scoop out the flesh and place in a food processor

If needed, you may add a couple of tablespoons of water so that it blends easier

Blend until smooth

Transfer to a medium saucepot and add the remaining ingredients

Cook at a low simmer, stirring frequently, for about 15 minutes

This really allows for the flavors to develop!

Allow to cool before putting into a jar to store in the refrigerator

To use: this is perfect as a dip for fruit, as a dessert topping, spread on a slice of homemade bread, or, my favorite way: on a Siete Foods burrito with eggs, apples and greens!


Bon Appétit!

Apple Pie Stuffed Snickerdoodles

I choose to slow down to connect with the gift I’m given in this moment.
IMG_8938.jpg

HELLO FALL!

Something about this season really just gets me every dang time! I don’t know if it’s the beauty that fall brings in New England (yes, I know I live in the south now!), the fact that I was married in the fall, the smells and flavors, the coziness… the list truly could go on FOREVER! There are just so many amazing foods that make me think of fall, apples and apple pie being at the top of the list!

I’ve done my fair share of apple desserts, and it helps that my husband and son love all things apple—I mean my husband buys apples specifically for himself… and that being said, I just wanted to add another good one to the books! This all started with me really wanting to make snickerdoodles, but that just doesn’t sound exciting enough for me, which is where the apples came in. As my 4-year wedding anniversary is coming up in just a few weeks, I will most likely spend every day until then reminiscing about what a beautiful, crazy, exhausting, perfect day that was, and there were SO many apples included in it. Like so many. One of the tiers of our cake was apple pie, we had baskets of apples all over the venue (a family tradition, oddly enough!), my father-in-law brings up said baskets every time we are together, part of my gifts to my bridesmaids were fall scented (mainly apple) candles, the list goes on and on.

Anyways, stuffing these spiced up cookies with some delicious apple pie filling only made sense! I’ve stuffed cookies before, like these caramel stuffed gingerbread cookies or maybe these caramel corn Nutella cookies helllooooo (!!), and I just love it! It’s a fun little surprise and adds so much more flavor. These cookies are soft and chewy all on their own but adding extra moisture to the middle only ups their game! I’ve also increased the spice level as well. Cinnamon is great and all, but freshly grated nutmeg and some cloves really intensify the fallness in this cookie!

While our fall here in Atlanta is still in the 80’s, there is definitely some foliage going on in our backyard and I’ve added some candles to the mix, so we are getting to the coziness level that I love! Our son may not remember his first fall except through all of the hundreds of photos we take per day, but I hope that when he starts to love all of the seasons like I do, it’s the smells and colors and flavors that bring him joy, just like they do me!

IMG_8910.jpg
IMG_8916.jpg
IMG_8920.jpg
IMG_8926.jpg
IMG_8931.jpg
IMG_8932.jpg
IMG_8942.jpg
IMG_8955.jpg
IMG_8957.jpg


apple filling ingredients

Apples—2 large, I love Gala or Honeycrisp

Cinnamon—1 TBL

Lemon Juice—½ lemon

Water—2 TBL


process

Cut up your apple into small, bite-sized pieces. Peeling is optional, I prefer to keep the peel on!

In a small saucepot, combine apples, cinnamon, lemon juice and water over low heat

Continue to stir every minute or two to make sure that all of the apples are getting cooked evenly

Cook until the apples become soft, this should take about 10-15 minutes depending on how small you have cut the apples

Remove from the heat and allow to cool while you’re making the cookie dough


cookie ingredients

Butter, room temperature—8 oz, or 1 C

Brown Sugar—6 oz, or ¾ C

Coconut Sugar—4.5 oz, or ¾ C

Eggs—2

Vanilla Extract—2 tsp

Flour—18 oz, or 3 C

Salt—1 tsp

Baking Soda—1 tsp

Cream of Tartar—2 tsp

Cinnamon—2 TBL

Nutmeg—1 ½ tsp

Cloves—1 tsp


process

In the bowl of your mixer, combine the softened butter and both of the sugars

Cream on medium speed for about 10 minutes, making sure to scrape down the bowl often

Once fluffy, turn mixer to low speed and add in the vanilla and then the eggs, one at a time

Beat until combined, again, making sure to scrape down the bowl often

In a large bowl, sift together the flour, salt, baking soda, cream of tartar, cinnamon, nutmeg and cloves

Slowly add this to the mixing bowl, while on low

Scrape down the sides of the bowl

Once all combined, turn the mixer off and prepare 2 cookie sheets with either a Silpat, nonstick spray or parchment

Scoop out all of the cookie dough using either a small-sized ice cream scoop, or about 2 TBL of dough.

Take one ball of scooped dough and flatten it

Add in about 2 tsp of the cooked apple pie filling

Take another ball of dough, flatten, and cover the apples

Pinch the sides together, roll the large cookie dough ball in your hands to make sure that no filling will leak out, and place on the baking sheet

Do this with the rest of your cookies

You may have some left-over apple-pie filling! This is amazing for a snack, my 7-month-old loves it, as it is just soft enough for him to eat!

Put your cookies in the fridge while you preheat the oven—this is the only chilling that is necessary!!

Preheat your oven to 350˚F

Once your oven is preheated, you now have two options: you may either bake just like this, or you can mix ½ C of sugar with 1 TBL of cinnamon and dip the tops of the cookies in this for extra flavor and crunch! They are so good both ways, but I love the added spice!

Bake for 12 minutes, rotate the pan, then bake for another 8 minutes

Remove from the oven and allow to cool on a cooling rack

These are best enjoyed warm, so if you are reheating, a good 20-30 seconds in the microwave does the trick!


Bon Appétit!

Dairy Free Chocolate Truffles

Love is the bridge between you and everything.
— Rumi
IMG_8593.jpg

Since having Oliver, I have truly found that there is nothing I love more than a quick snack, especially one that I can also enjoy as a dessert!

Could I take the time to make something that takes me hours and is super complex? Sure! Do I want to? No! Like I’ve mentioned, I cannot wait until Oliver is old enough to help me in the kitchen (if he wants to, of course!), so maybe I will feel more inclined to spend over an hour+ baking. For now, I like things short and sweet! I get the bulk of my things done while he is napping, which now we are lucky if he naps 3 times per day! When he’s up, it’s constant playing, reading, going for walks, bouncing, swimming, eating…the list goes on and on! If I really need to get something done or take a break myself, sure, I will put some Moana on for a few minutes and he is SO fine just zoning out to watch them. And, who am I kidding, I’m all about it, too!

About a week ago, during a nap, I tried to make the oh-so-popular energy balls/bites, what have you and they tasted like SAWDUST. I actually thought I was going to choke with how bad they were! Must husband took 1 bite and gladly passed. Nothing helped them go down easy, so they went right in the trash! This week, I didn’t want another dry, choking hazard recipe, so I made sure to add in something other than just coconut oil to bind the nut flour. BOOM. Got it!

Nut butter for the win!

Once I perfected the recipe and ate probably half of the dough, I knew it was a winner. These babies taste like chocolate truffles!! They’re rich, creamy, satisfying, while also dairy free (!!), vegan (!!), and just SO DANG GOOD. As always, they’re nice and quick. They can be a dessert, an afternoon pick-me-up, a pre-workout energy bite—these babies have some range, let me tell you! So, while we are still all at home, spice up your date nights with them, give yourself a boost with them, treat yo’self with a few while you watch a movie on a wild Friday night, just be careful because these are ADDICTING!

IMG_8568.jpg
IMG_8573.jpg
IMG_8577.jpg
IMG_8579.jpg
IMG_8589.jpg
IMG_8595.jpg


ingredients

Almond Flour—4.25 oz, or 1 C

Nut Butter—4 oz, or ½ C

Dates, pitted—8

Cocoa Powder—1.5 oz, or ½ C

Collagen Powder—2 scoops

Salt—1 tsp

Cinnamon—1 TBL

Vanilla Extract—1 tsp

Coconut Oil, melted—2 oz, or ¼ C

Chocolate Chips—2.25 oz, or 1/3 C


process

In the bowl of your food processor, with the blade, combine the almond flour, nut butter**, dates, cocoa powder, collagen, salt, cinnamon and vanilla extract.

Pulse until combined.

Once combined and with the food processor on, stream in the coconut oil. Stop when all combined and forms a ball.

Add in the chocolate chips and pulse for 5-10 seconds.

Take a small scoop and scoop out the dough, placing them on a parchment lined tray or a Silpat.

Place in the refrigerator to firm up a bit.

This part is optional, but so worth it! Melt either some chocolate or nut butter, drizzle on top of the set truffles, sprinkle with salt.

Allow to set again in the refrigerator.

Once set, can all be stored together in an airtight container in the fridge.

**For the nut butter, I did a combination of peanut butter and almond butter, as I find that peanut butter can be VERY sweet! The combination here is great, it doesn’t overpower any of the chocolate in these bites, or make them overly sweet, either! Of course, all peanut butter, or any other nut butter, is perfectly fine!**


Bon Appétit!

Nutella Swirled Coffee Cake

Happy Weekend! Happy Valentine’s Day! Happy let’s-celebrate-with-a-coffee-cake-day!

Did I make that last one up? Maybe, but I am just beyond excited about this recipe down below.

You know those weekends when it’s so cold, all you want to do is snuggle up in your big bed that’s full of everything cozy—fleece sheets, down comforter, warmth? The high of 18˚ has you contemplating breaking your rule of no eating in bed? Yeah. It’s one of those weekends!

Luckily, it’s supposed to get back up in the 50’s by the end of next week, so I can daydream about that for the two days when I decide to run all of my errands in the freezing cold. But let’s forget for a moment about this snowless, cold winter we are having, and think about cake. For breakfast. In bed.

Aka Coffee Cake.

For some reason, every woman in my family is great at making coffee cakes—possibly because it’s acceptable to have cake early in the morning, so we take full advantage of that. Anytime we ever visit my aunt in Chicago, it’s lots and lots of coffee, lots and lots of coffee cake (that Roberto is obsessed with) and lots and lots of talking, just how I like it! My mom makes an out-of-this-world Honey Bun cake, where she takes away the crumb and adds a ridiculously sweet, yummy glaze. Now it’s my turn to join these fabulous ladies in a family tradition!

What’s my little secret to this ever so moist, ever so cinnamonny, and ever so crumby cake? The Nutella layer that is swirled in the middle of the cake.

Ohhhhh yes, Nutella, something you can never go wrong with!

So, this cake is basically like oh hey, I’m a dense, wonderful coffee cake, I’m full of yogurt and moistness, and surprise! I’m filled with a chocolatey, hazelnutty center.

You are welcome.

While I sit here on this beautiful and quiet morning, cozy in my apartment and 14˚F outside, I’ll try my best not to get any more crumbs in the bed or Nutella traces on my face…but you’ll understand the struggle in an hour once your cake is baked!

crumb ingredients

Flour—3.75 oz, or ¾ C

Brown Sugar—0.75 oz, or 1 ½ TBL

Cinnamon—1 tsp

Butter, melted—2 oz, or 4 TBL

Milk—0.5 oz, or 1 TBL


process

In the bowl of your mixer, combine the flour, brown sugar and cinnamon.

Mix.

With the mixer on low, slowly stream in the melted butter and then the milk.

Mix just until small pebble sized pieces have formed.

Reserve in a separate bowl until ready to use in your cake!


cake ingredients

Butter, room temperature—3 oz, or 6 TBL

Brown Sugar—4 oz, or ½ C

Eggs—1

Vanilla Extract—1 ½ tsp

Yogurt—5 oz, or ½ C

Milk—4 oz, or ½ C

Flour—7.5 oz, or 1 ¼ C

Baking Soda—¼ tsp

Baking Powder—½ tsp

Salt—½ tsp

Cinnamon—1 ½ tsp

Nutmeg—½ tsp

Nutella, optional—¼ C


process

Preheat your oven to 350˚ F.

In the bowl of your mixer, cream together the butter and brown sugar.

Once smooth, add in your egg and vanilla until combined, making sure to scrape down the sides of the bowl if necessary.

Sift together all of your dry ingredients—the flour, baking soda, baking powder, salt, cinnamon and nutmeg.

Alternate adding some of the dry ingredients to the mixing bowl, on low speed, with the yogurt and milk.

Once all of your dry ingredients, the yogurt and milk have been added, and the batter has just formed, turn off your mixer.

Prepare a small 6” cake pan by spraying with nonstick spray and then either lining the bottom with parchment paper or sprinkling a small amount of flour just to lightly coat the pan.

Put in half of your cake batter.

Now the optional part—adding a nice, thick coating of Nutella on top of the crumb makes for an incredible surprise! While this is optional, or using another nut butter can be just as tasty, the sweetness from the chocolate and nuttiness of the hazelnuts does wonders for this coffee cake!

Cover completely with half of the crumbs you made earlier.

Top with the rest of the cake batter and sprinkle with the remaining crumb.

Place in your over and bake for 45-50 minutes, the cake should be slightly golden brown.

Allow to cool just a little before taking out of the pan and eating!


Bon Appétit!