Apple Pie Stuffed Snickerdoodles

I choose to slow down to connect with the gift I’m given in this moment.
IMG_8938.jpg

HELLO FALL!

Something about this season really just gets me every dang time! I don’t know if it’s the beauty that fall brings in New England (yes, I know I live in the south now!), the fact that I was married in the fall, the smells and flavors, the coziness… the list truly could go on FOREVER! There are just so many amazing foods that make me think of fall, apples and apple pie being at the top of the list!

I’ve done my fair share of apple desserts, and it helps that my husband and son love all things apple—I mean my husband buys apples specifically for himself… and that being said, I just wanted to add another good one to the books! This all started with me really wanting to make snickerdoodles, but that just doesn’t sound exciting enough for me, which is where the apples came in. As my 4-year wedding anniversary is coming up in just a few weeks, I will most likely spend every day until then reminiscing about what a beautiful, crazy, exhausting, perfect day that was, and there were SO many apples included in it. Like so many. One of the tiers of our cake was apple pie, we had baskets of apples all over the venue (a family tradition, oddly enough!), my father-in-law brings up said baskets every time we are together, part of my gifts to my bridesmaids were fall scented (mainly apple) candles, the list goes on and on.

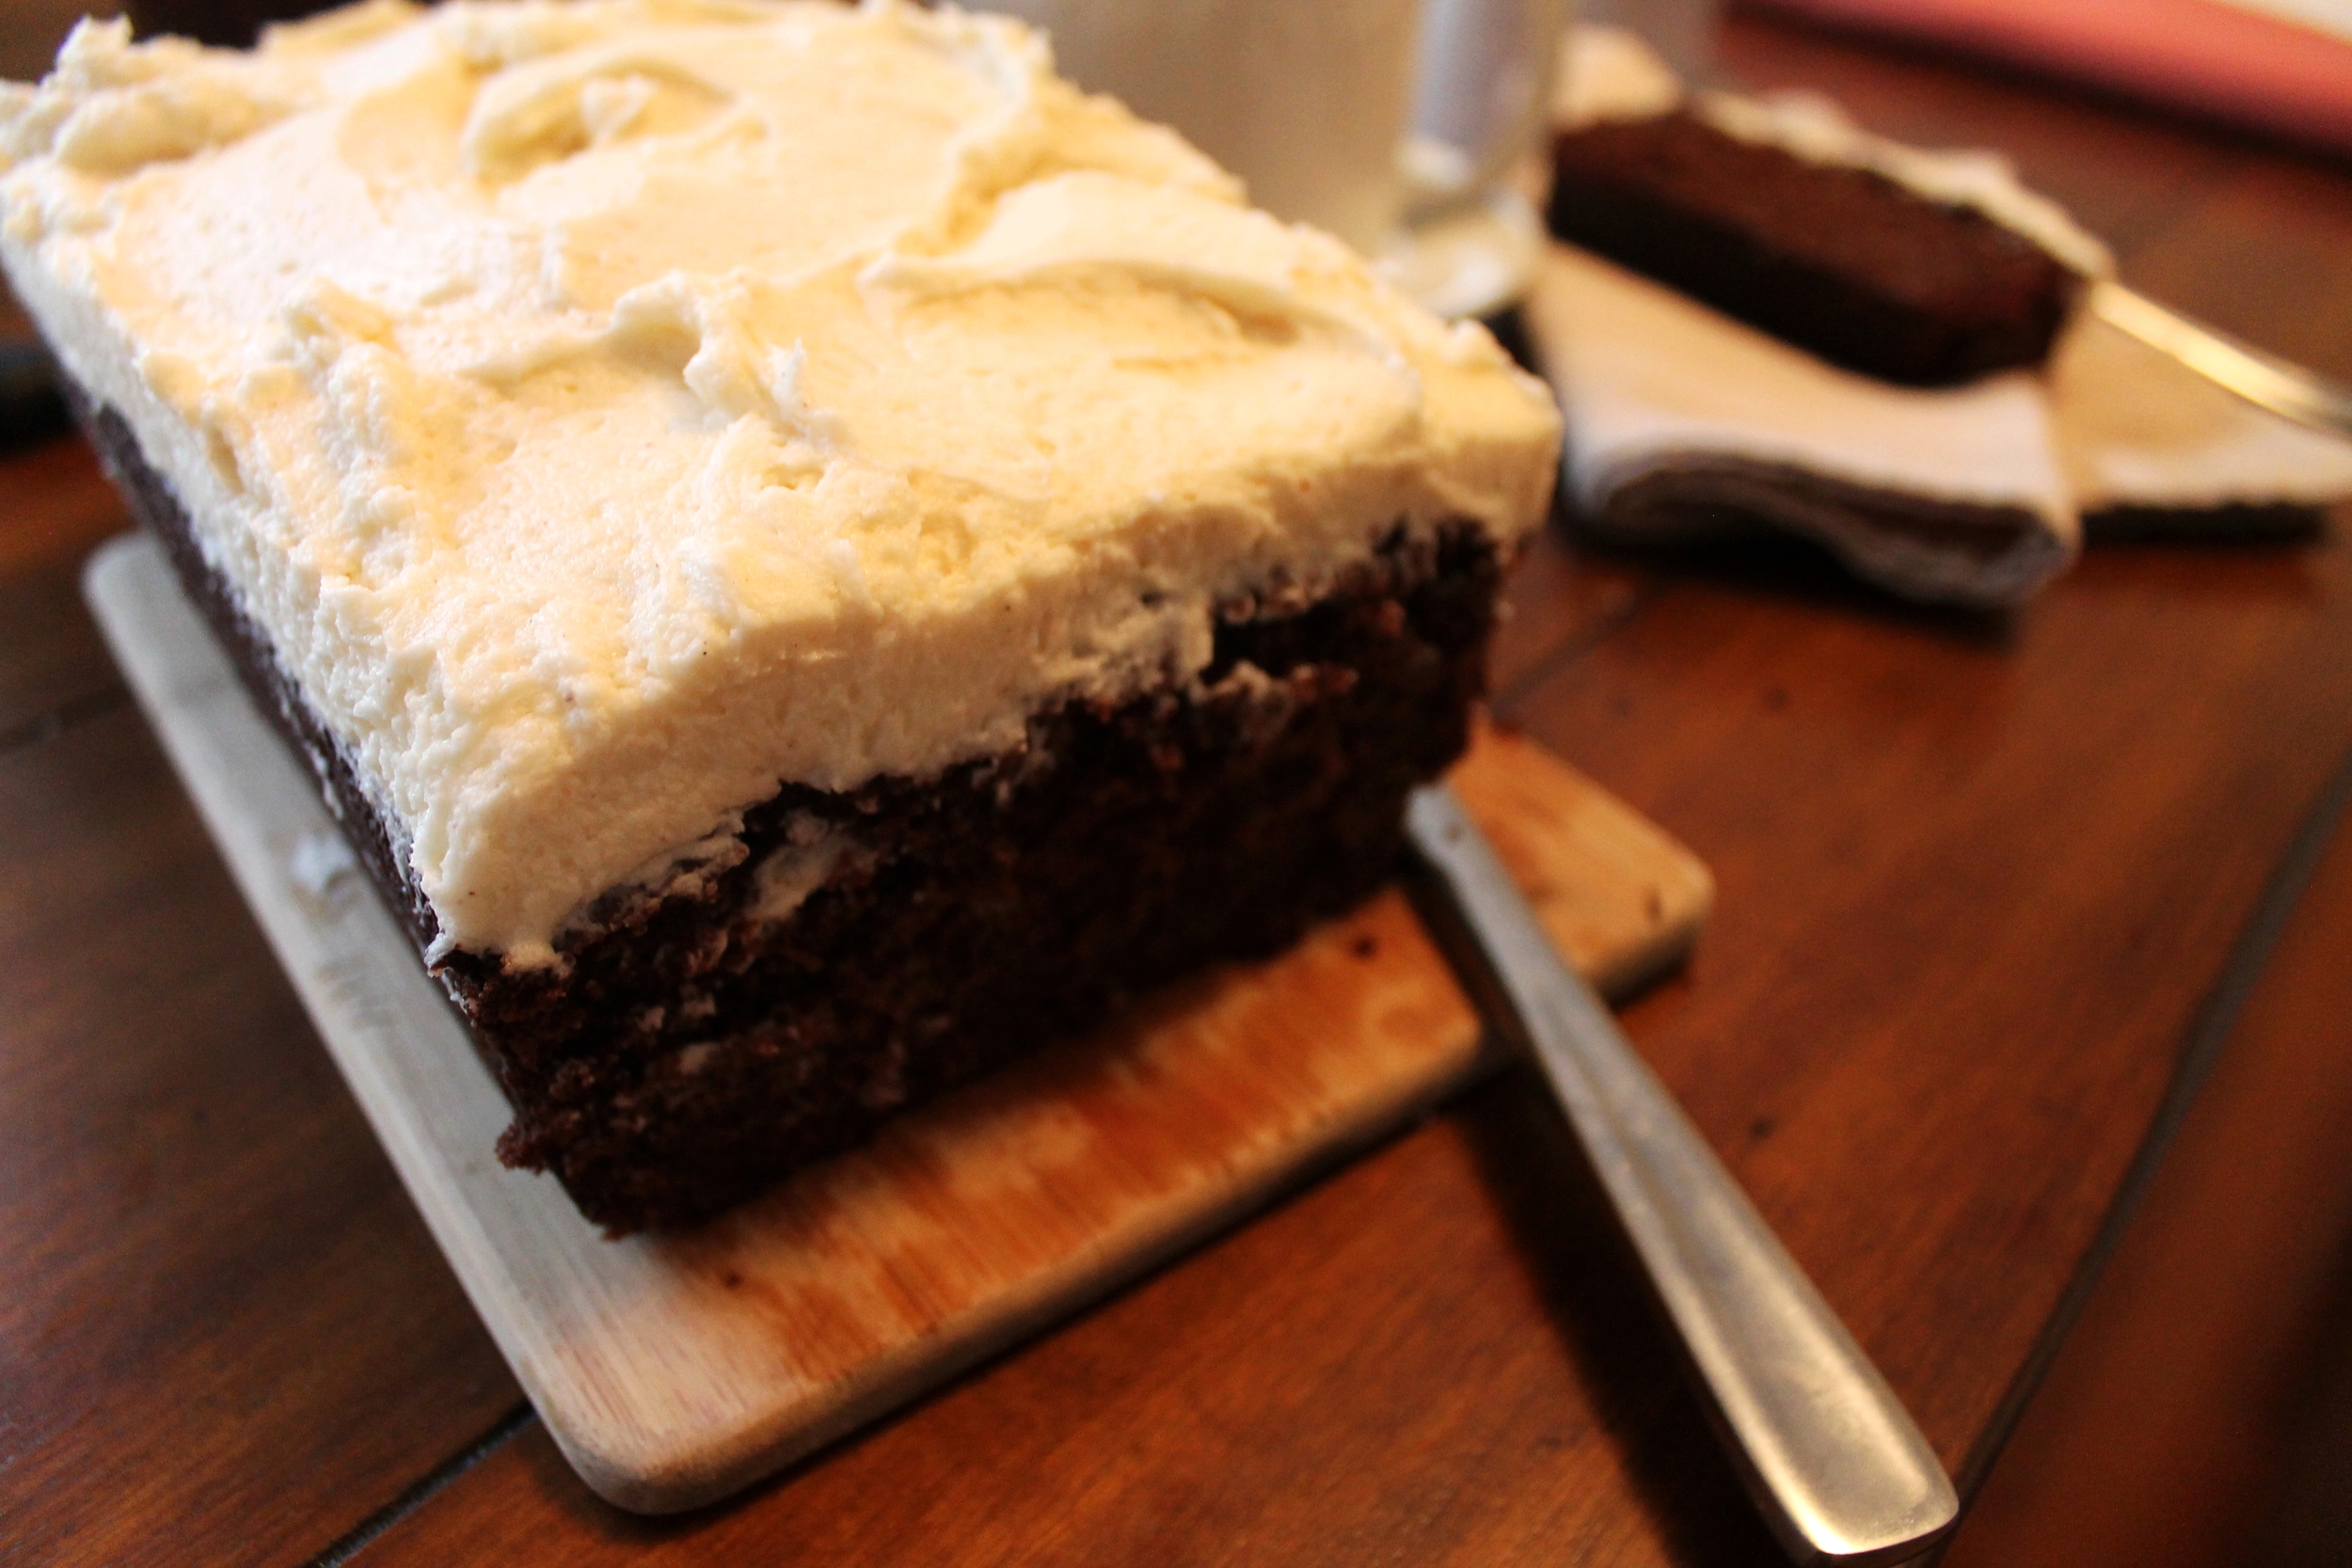
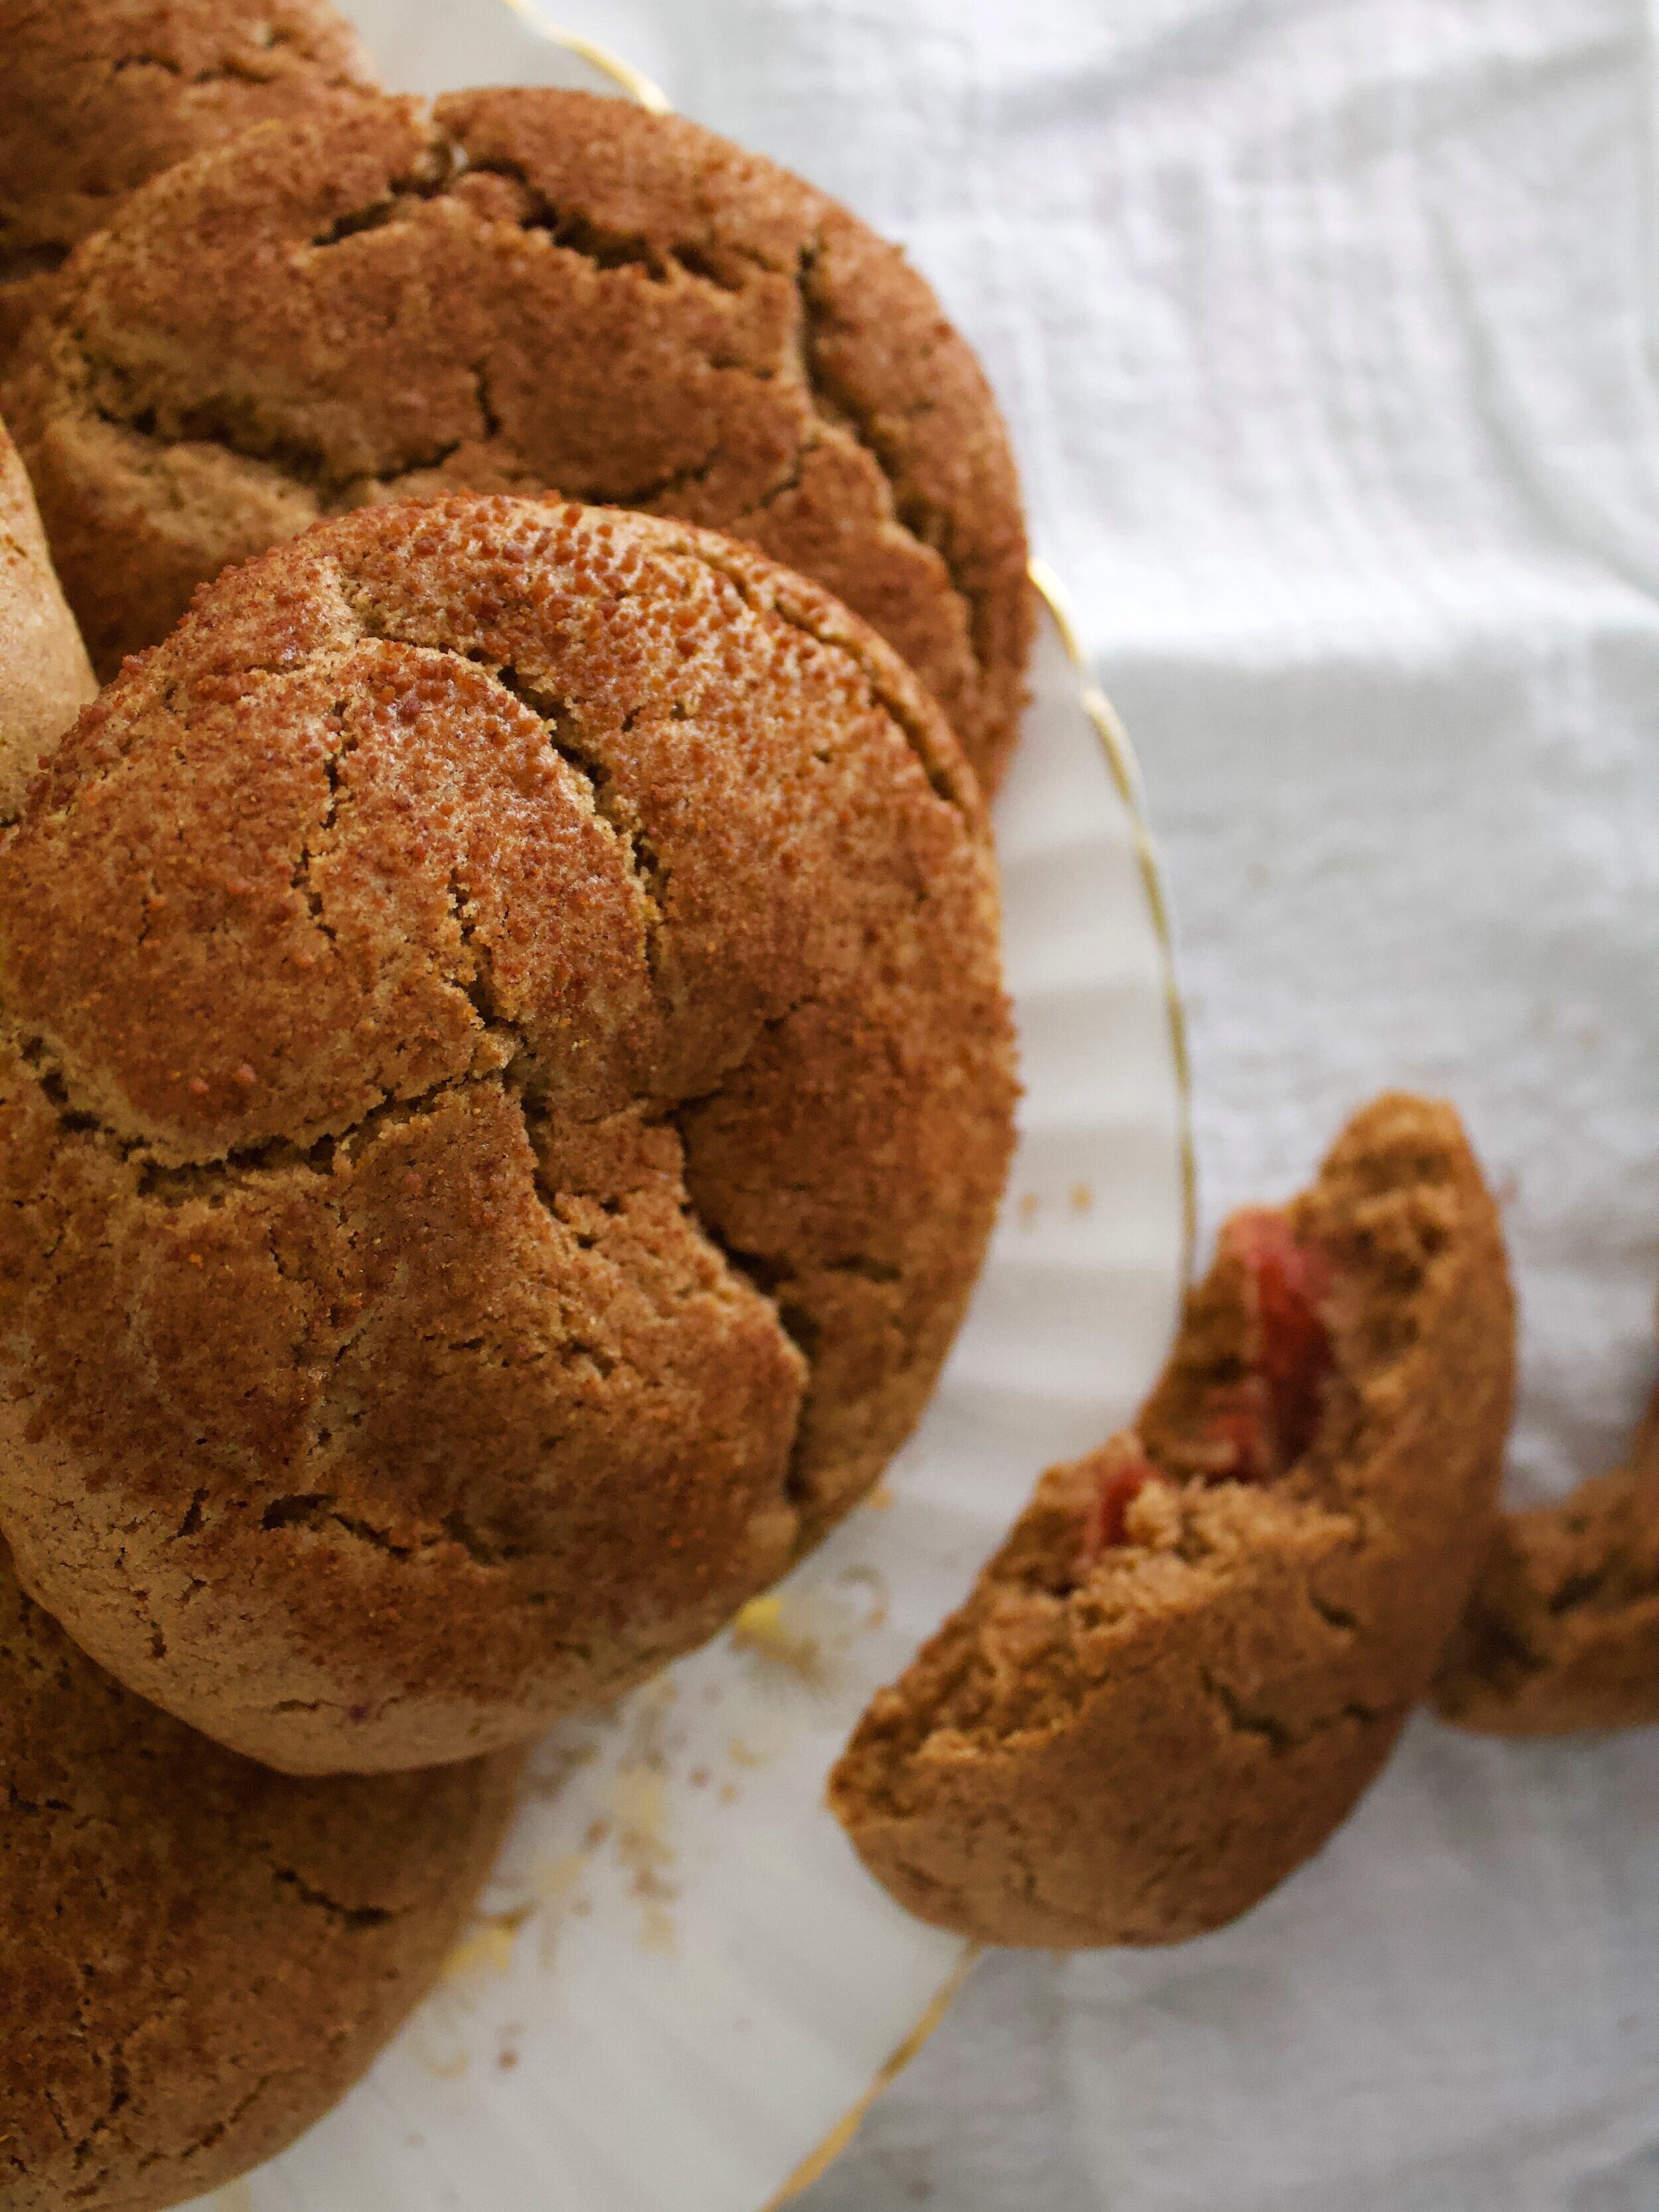
Anyways, stuffing these spiced up cookies with some delicious apple pie filling only made sense! I’ve stuffed cookies before, like these caramel stuffed gingerbread cookies or maybe these caramel corn Nutella cookies helllooooo (!!), and I just love it! It’s a fun little surprise and adds so much more flavor. These cookies are soft and chewy all on their own but adding extra moisture to the middle only ups their game! I’ve also increased the spice level as well. Cinnamon is great and all, but freshly grated nutmeg and some cloves really intensify the fallness in this cookie!

While our fall here in Atlanta is still in the 80’s, there is definitely some foliage going on in our backyard and I’ve added some candles to the mix, so we are getting to the coziness level that I love! Our son may not remember his first fall except through all of the hundreds of photos we take per day, but I hope that when he starts to love all of the seasons like I do, it’s the smells and colors and flavors that bring him joy, just like they do me!

IMG_8910.jpg
IMG_8916.jpg
IMG_8920.jpg
IMG_8926.jpg
IMG_8931.jpg
IMG_8932.jpg
IMG_8942.jpg
IMG_8955.jpg
IMG_8957.jpg


apple filling ingredients

Apples—2 large, I love Gala or Honeycrisp

Cinnamon—1 TBL

Lemon Juice—½ lemon

Water—2 TBL


process

Cut up your apple into small, bite-sized pieces. Peeling is optional, I prefer to keep the peel on!

In a small saucepot, combine apples, cinnamon, lemon juice and water over low heat

Continue to stir every minute or two to make sure that all of the apples are getting cooked evenly

Cook until the apples become soft, this should take about 10-15 minutes depending on how small you have cut the apples

Remove from the heat and allow to cool while you’re making the cookie dough


cookie ingredients

Butter, room temperature—8 oz, or 1 C

Brown Sugar—6 oz, or ¾ C

Coconut Sugar—4.5 oz, or ¾ C

Eggs—2

Vanilla Extract—2 tsp

Flour—18 oz, or 3 C

Salt—1 tsp

Baking Soda—1 tsp

Cream of Tartar—2 tsp

Cinnamon—2 TBL

Nutmeg—1 ½ tsp

Cloves—1 tsp


process

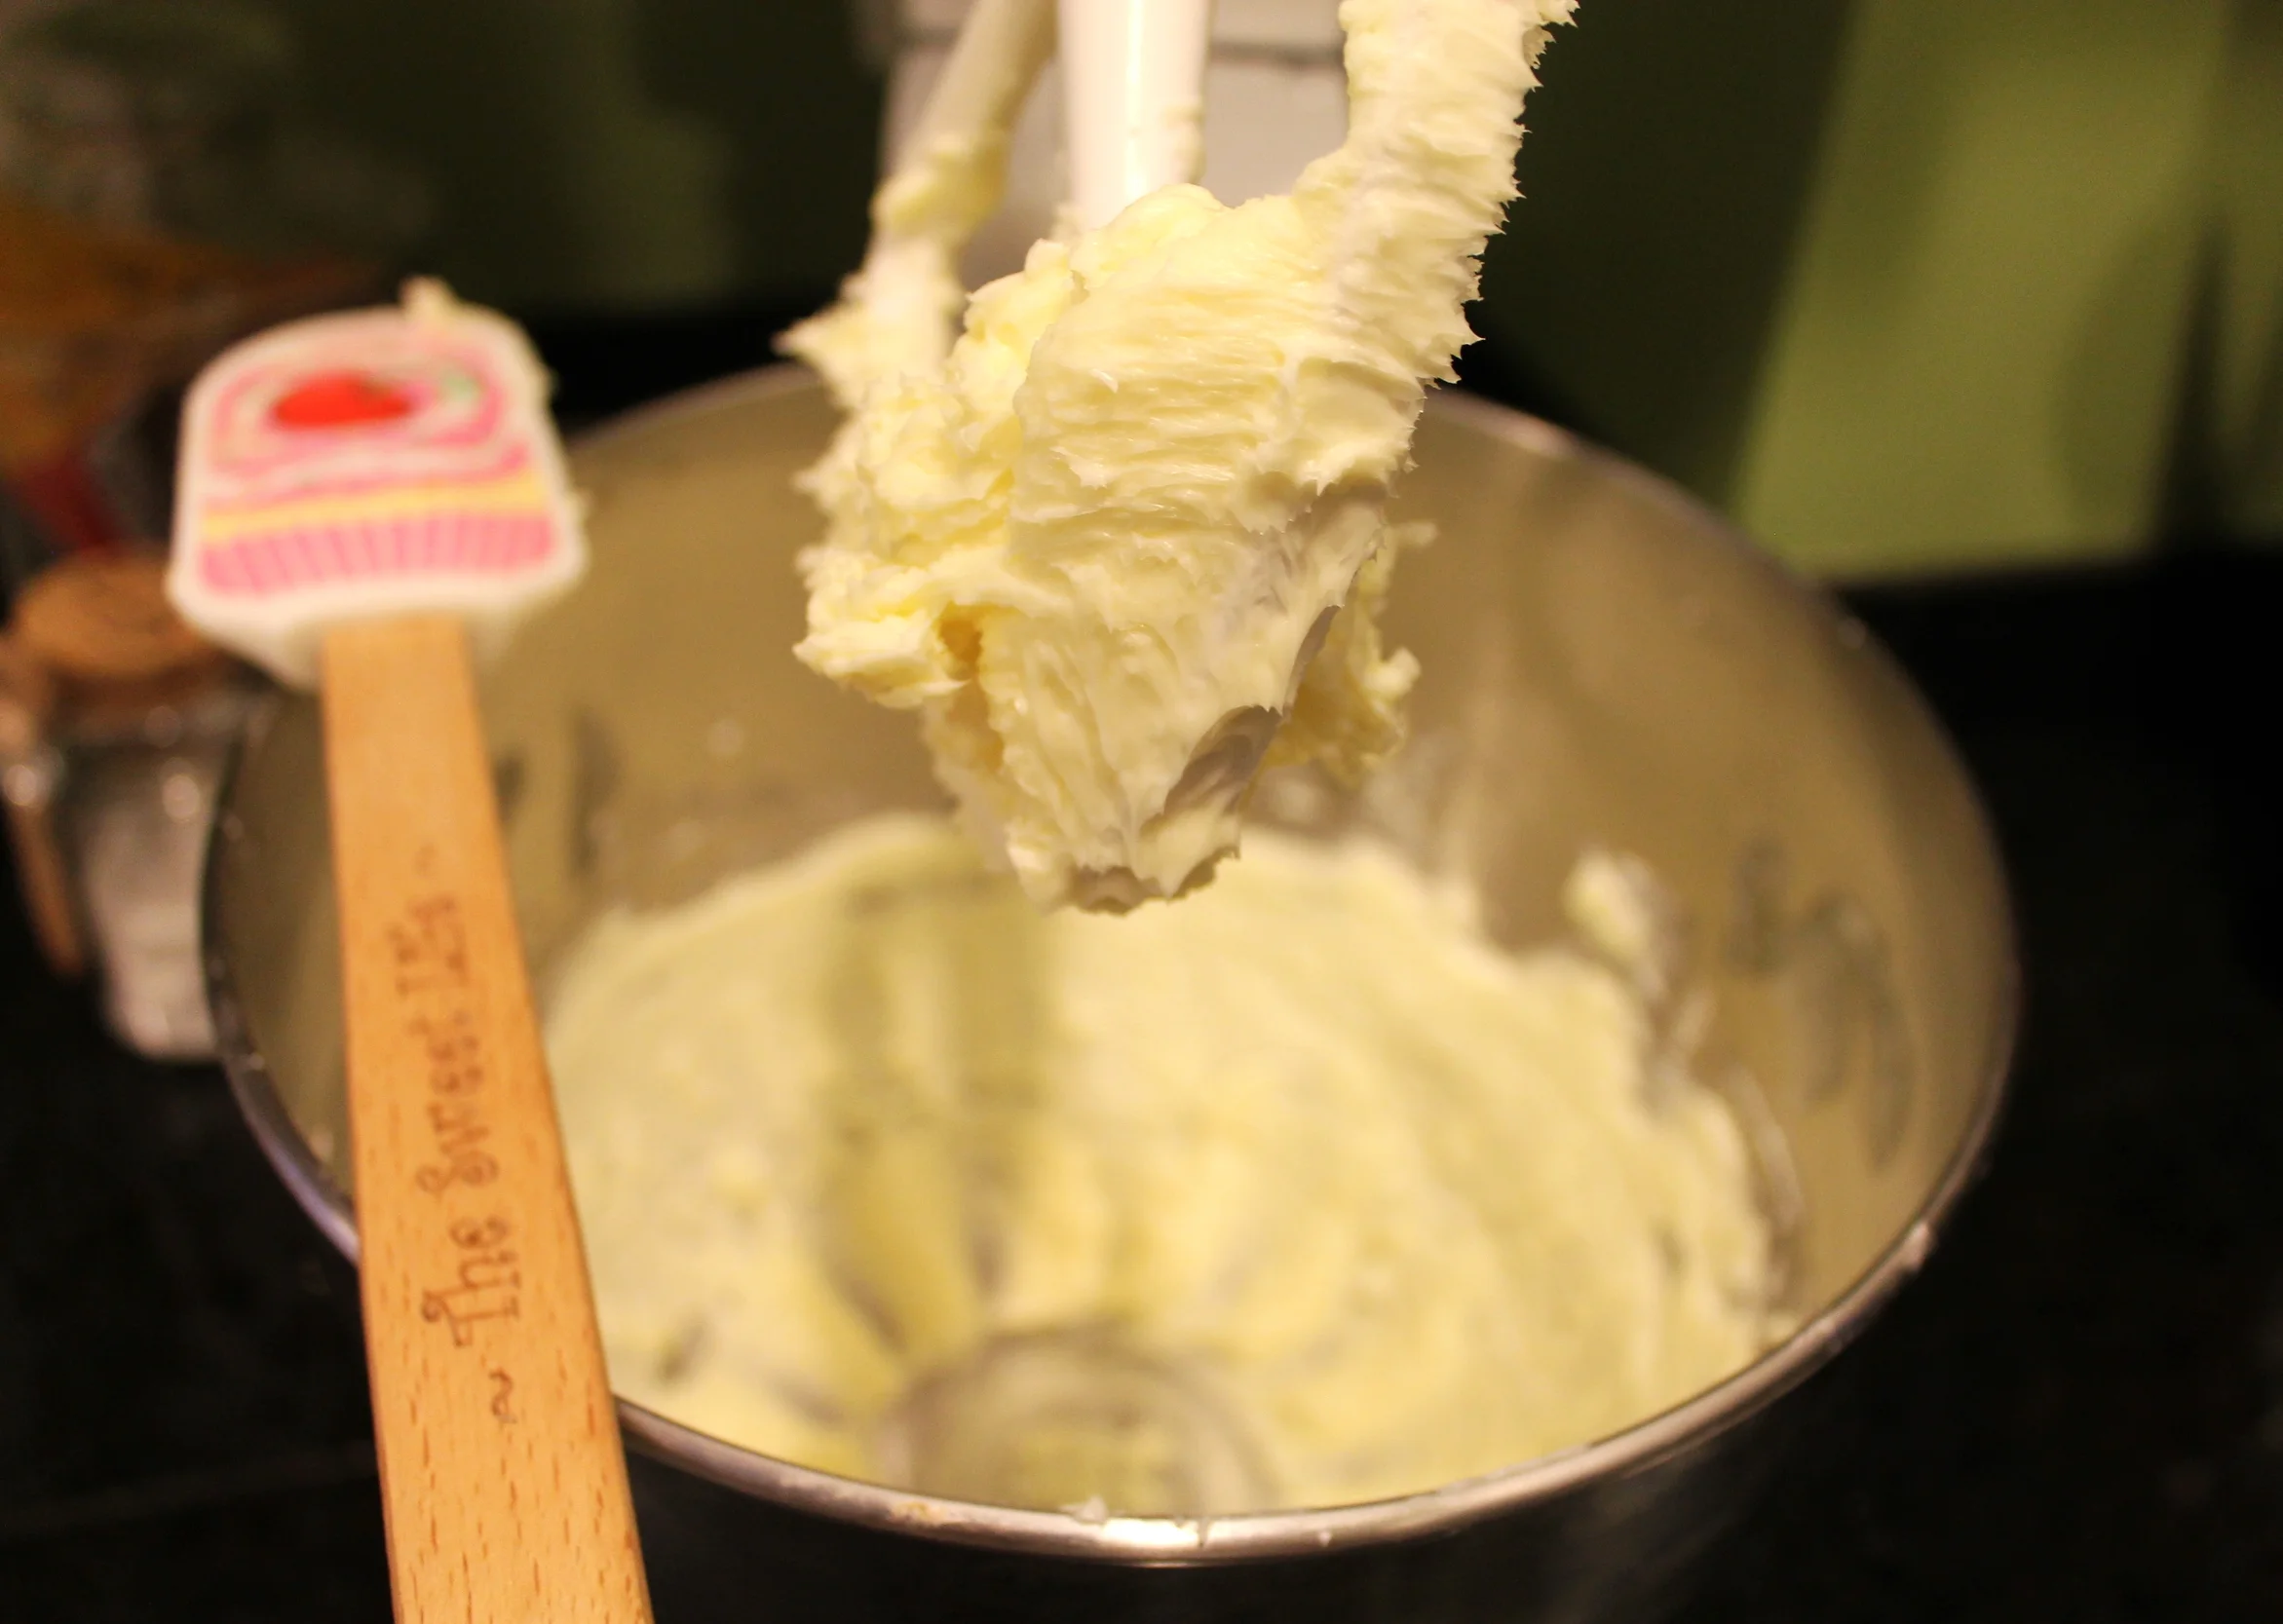
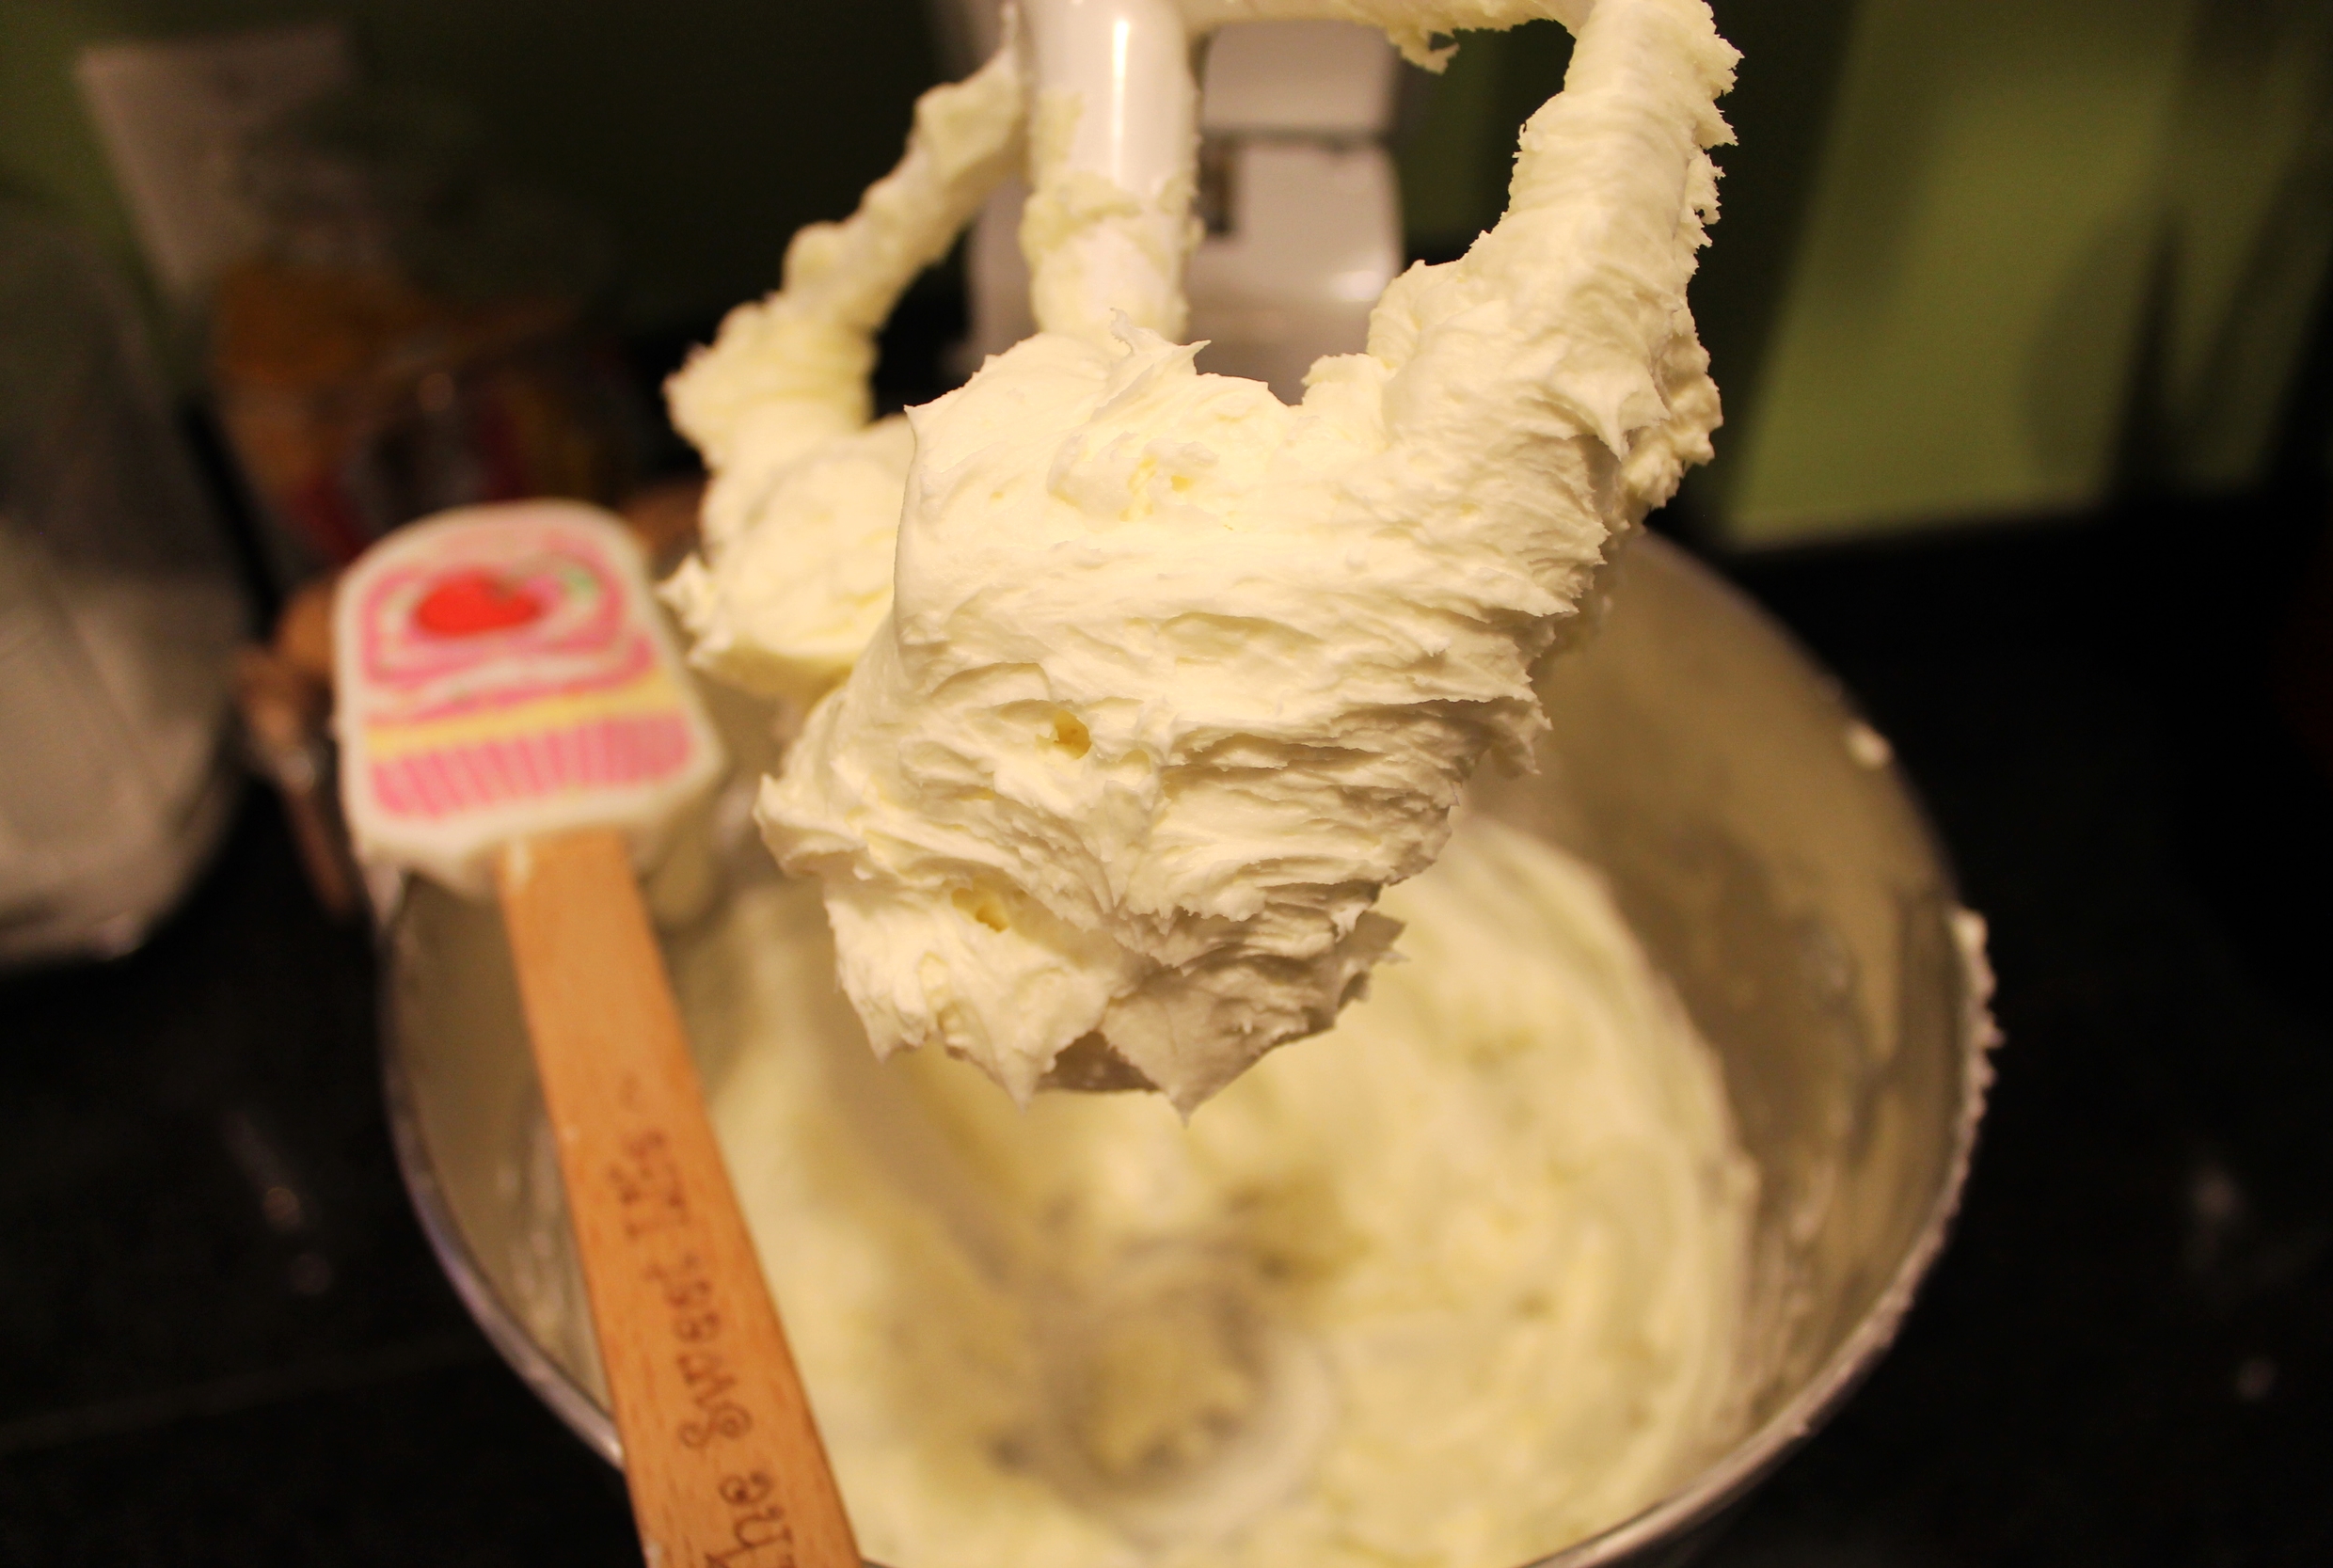
In the bowl of your mixer, combine the softened butter and both of the sugars

Cream on medium speed for about 10 minutes, making sure to scrape down the bowl often

Once fluffy, turn mixer to low speed and add in the vanilla and then the eggs, one at a time

Beat until combined, again, making sure to scrape down the bowl often

In a large bowl, sift together the flour, salt, baking soda, cream of tartar, cinnamon, nutmeg and cloves

Slowly add this to the mixing bowl, while on low

Scrape down the sides of the bowl

Once all combined, turn the mixer off and prepare 2 cookie sheets with either a Silpat, nonstick spray or parchment

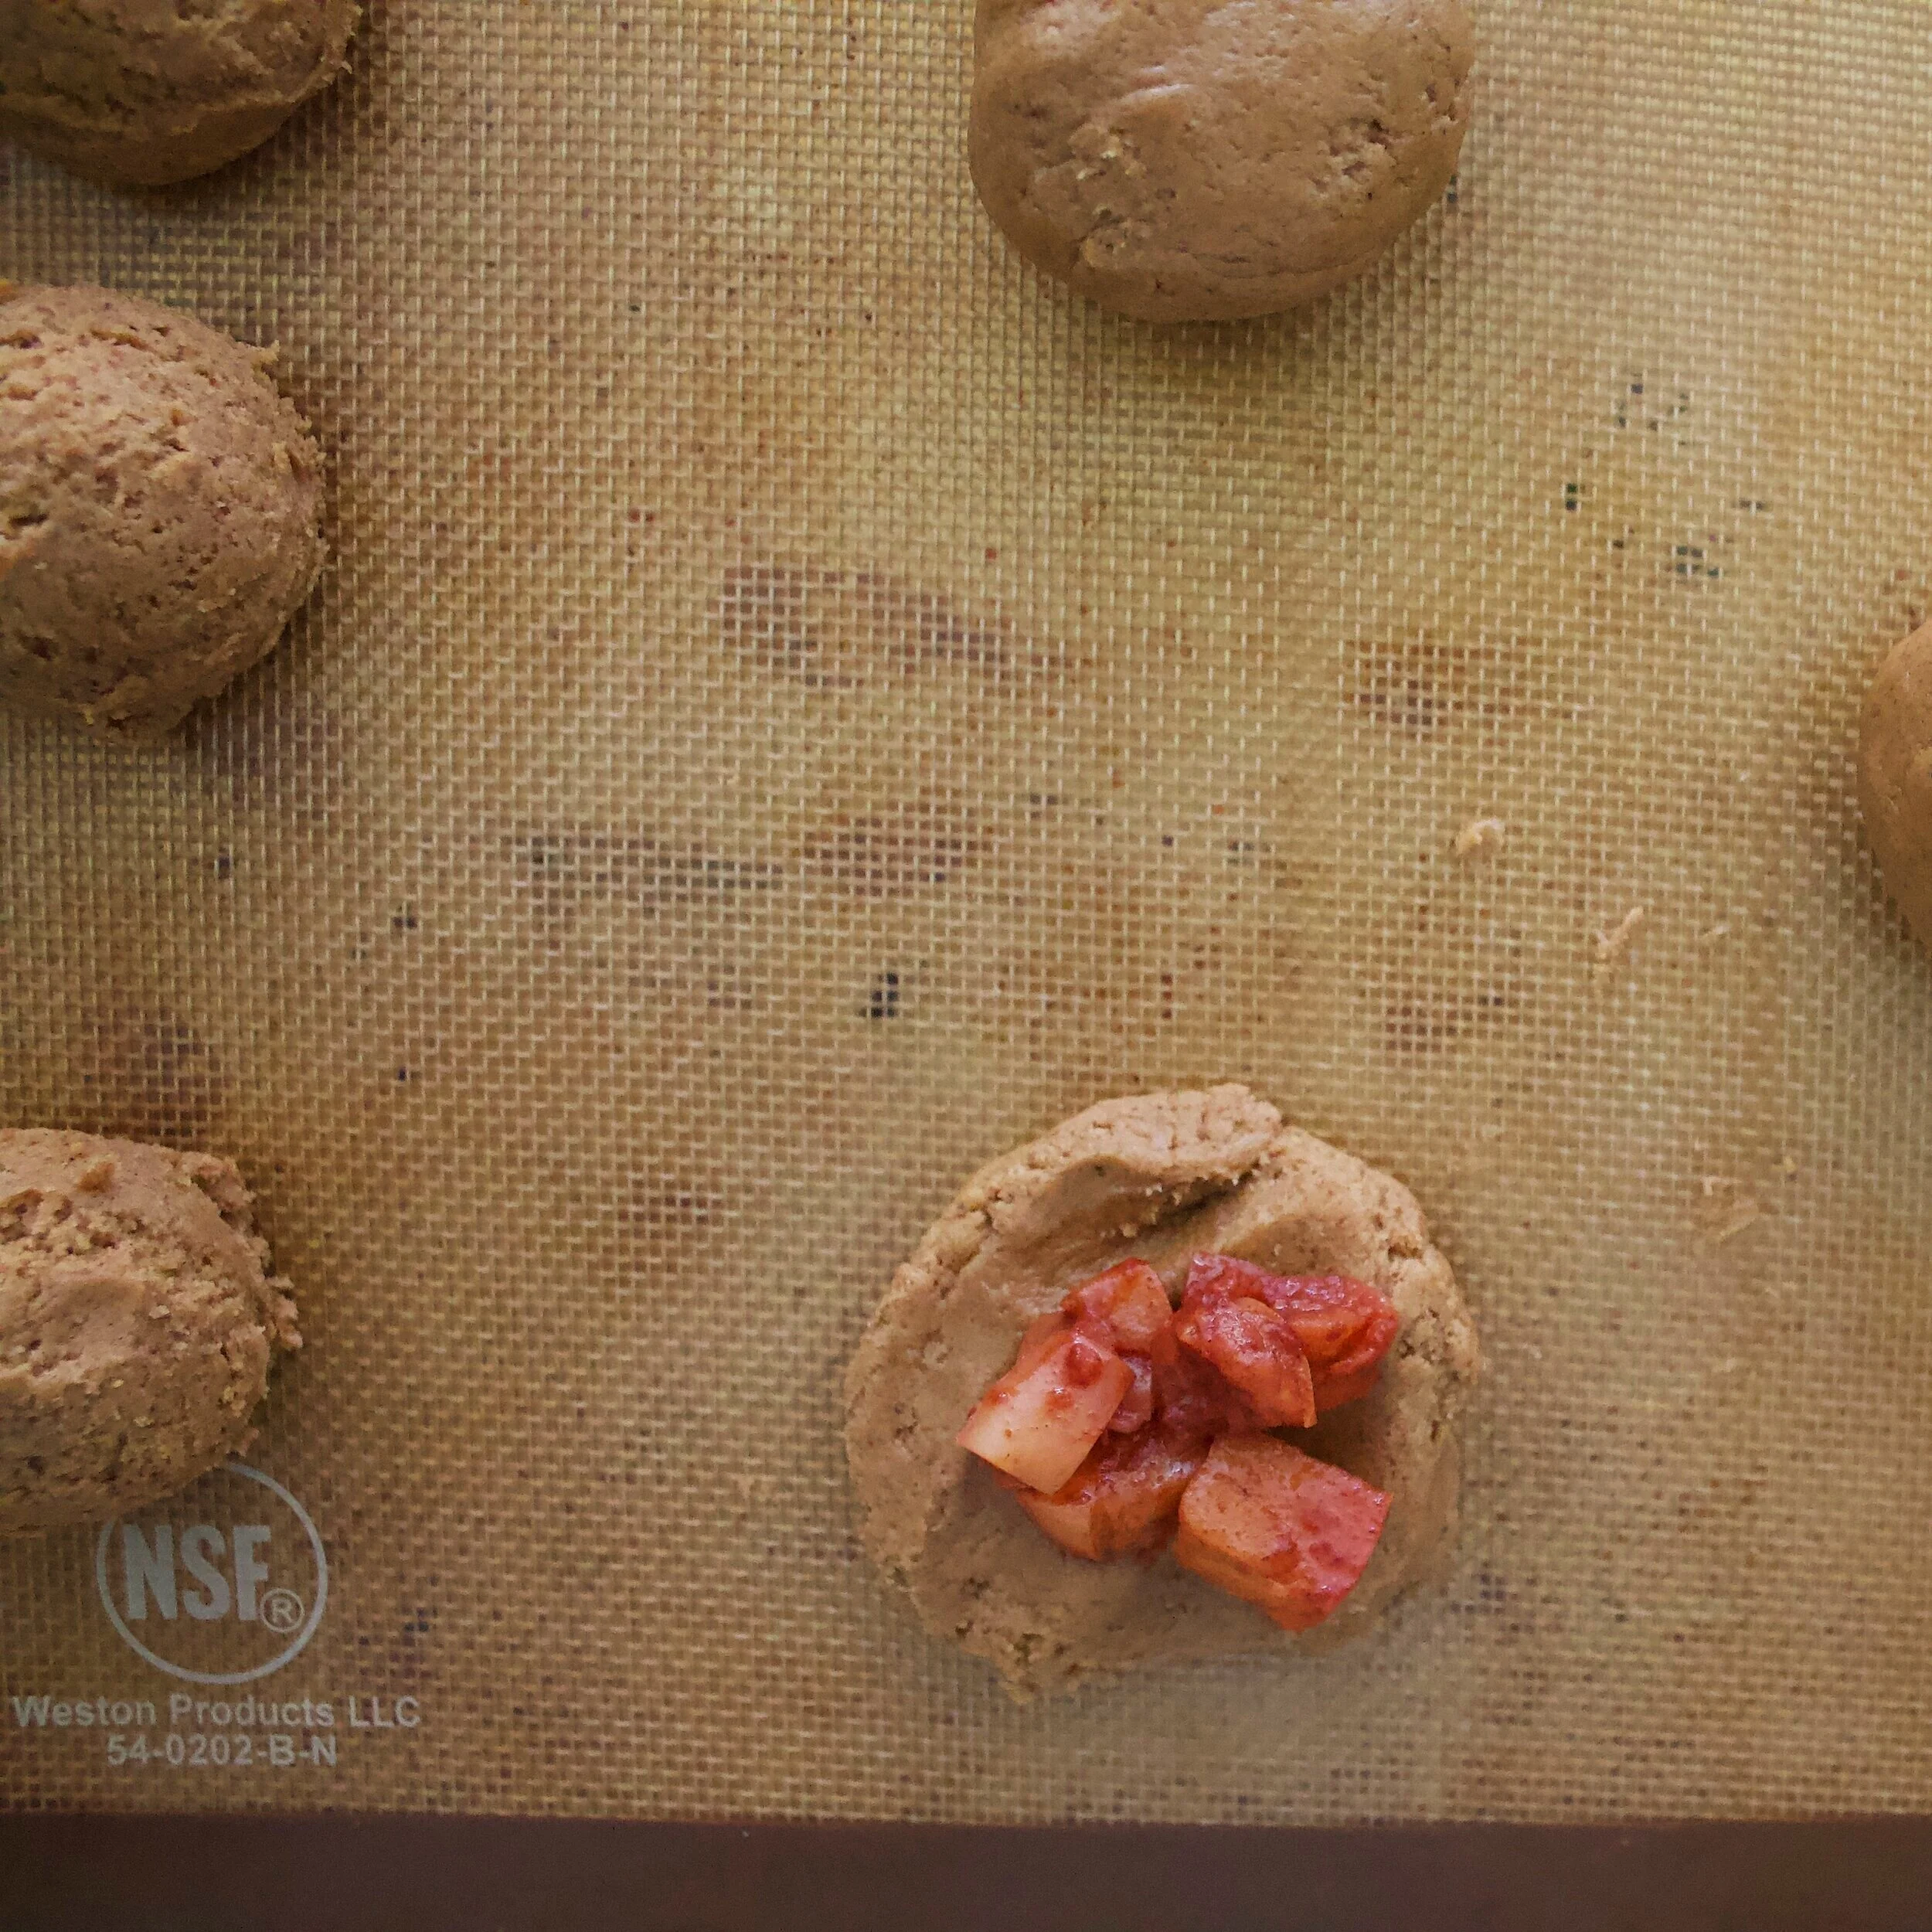
Scoop out all of the cookie dough using either a small-sized ice cream scoop, or about 2 TBL of dough.

Take one ball of scooped dough and flatten it

Add in about 2 tsp of the cooked apple pie filling

Take another ball of dough, flatten, and cover the apples

Pinch the sides together, roll the large cookie dough ball in your hands to make sure that no filling will leak out, and place on the baking sheet

Do this with the rest of your cookies

You may have some left-over apple-pie filling! This is amazing for a snack, my 7-month-old loves it, as it is just soft enough for him to eat!

Put your cookies in the fridge while you preheat the oven—this is the only chilling that is necessary!!

Preheat your oven to 350˚F

Once your oven is preheated, you now have two options: you may either bake just like this, or you can mix ½ C of sugar with 1 TBL of cinnamon and dip the tops of the cookies in this for extra flavor and crunch! They are so good both ways, but I love the added spice!

Bake for 12 minutes, rotate the pan, then bake for another 8 minutes

Remove from the oven and allow to cool on a cooling rack

These are best enjoyed warm, so if you are reheating, a good 20-30 seconds in the microwave does the trick!


Bon Appétit!

Chai Spice Snickerdoodles


It’s holiday baking season!!! The best time of the year!!!

Yeah yeah, I have been nonexistent on this bad boy for a majority of the year, but that’s life! When you buy a house, change jobs AND find out you’re pregnant, my little passion project that is this blog seems to go to the backburner. Or, well, into storage, where it gathered a lot of dust and you only remember it when you’re busting out the Christmas decorations mid-November…

All of this being said, I’m going to do my best to post on here as often as I can! Seeing as I am no longer working in a bakery, I actually miss doing it a lot! I’m no longer drained from 2am wake ups, my feet don’t hurt from standing on them all day long in a bakeshop, and I actually have true weekends now, so I’m going to enjoy this life as long as I can until the baby boy comes in February, and get back into this wonderful world of baking! 

Now that y’all are up to speed with my personal life, let’s talk COOKIES! I love a cookie, especially a holiday one. The flavors are incredibly inviting, the options are endless, and they are simple. That’s exactly what I love around the holidays. You can bake up a million different types of cookies, fill platters with them, gift them, bake them all day long and feel accomplished, plus, they’re easy! Sure, if you’re hand cutting them and decorating them with piped icing, that takes some time, but overall, they’re the most loving and forgiving of desserts!

 I first made these chai spiced snickerdoodles for my work Halloween party (and won 1stprize I might add!) and decorated them with some buttercream and spooky eyes for that mummy look. When I put these out, all I could think of was uhhh HOLIDAY COOKIE STAPLE! They’re soft, they’re filled with the perfect blend of spices, they’re cozy, I could go on. These chai spiced snickerdoodles are also light enough to not give you that belly ache when you eat a few after dinner, or for a snack…see, perfection.

The recipe is a nice creamed cookie method, and you have TOTAL control over what spices are added! Also, black pepper? Yep—that’s in chai! So it’s in these babies, too. If you want more or less of something, of course, that’s up to you and your taste buds. Also, the chocolate drizzle is another optional addition to these, but it’s a nice touch to the sweet outside of the cookie to put something slightly rich yet not overwhelming on them, so I promise that you won’t regret that drizzle!

WELL! Happy holiday baking season, let’s spend this next month turning up in the kitchen, belting out your favorite holiday tunes, putting lights in every open space, and just being full of joy and happiness (and cookies…)!


ingredients

Butter—13 oz, or 1 ½ C

Brown Sugar—8 oz, or 1 C

Eggs—2

Vanilla—2 tsp

Flour—15 oz, or 3 C

Baking Soda—1 tsp

Baking Powder—1 tsp

Salt—½ tsp

Cinnamon—2 tsp

Black Pepper—1 tsp

Maca Powder (optional)—1 tsp


Sugar—½ C

Cinnamon—1 ½ TBL

Ginger—1 tsp

Cloves—½ tsp

Nutmeg—1 tsp

Black Pepper—¼ tsp


Semisweet Chocolate—8 oz, melted


process

In the bowl of your mixer, cream the butter and sugar until light and fluffy.

Add in the eggs and vanilla, and mix until combined. Scraping down the sides of the bowl is necessary for this step.

In a separate bowl, sift together all of the dry ingredients (from flour-maca powder).

With the mixer on low, slowly add in the dry ingredients to the creamed ingredients.

Mix until combined, scraping down when needed.

Wrap and transfer cookie dough into the refrigerator for a couple of hours.

When you are ready to bake cookies, preheat your oven to 350 F.

In a small bowl, combine the sugar and spices.

Roll your cookie dough into 1.5 oz balls, or about 2 TBL worth of dough—of course you can make these as small or as large as you’d like!

Roll each ball into the sugar spice mixture and place on a baking sheet lined with a Silpat or sprayed with nonstick spray.

Bake cookies 12-15 minutes. They will be slightly browned on the edges, with a nice soft center, this will be what keeps them so soft.

Place on a cooling rack until ready to coat in chocolate.

When you are ready to drizzle chocolate on these cookies, melt your chocolate (I like a nice 70%-80%) either in the microwave or in a double boiler over the stove.

To drizzle, you may either use a piping bag, a spatula or a spoon to drizzle as much or as little chocolate as you’d like over these cookies.

Allow to cool before storing. These can be stored at room temperature up to a week!

Recipe makes 2 dozen cookies.


Bon Appétit!

Healthy Granola Bars

Have I mentioned that I am the ultimate snacker? While I try to make the better decisions like carrots and nuts, if a chocolate chip gets in my line of sight, I can’t help myself and just go for it!

With winter upon us and Storm Jonas covering our little city of Charleston in about 18” of snow, the most physical activity that we’ll be getting anytime soon is shoveling, shoveling and more shoveling, meaning that choosing healthy and filling snacks is a must. Do I wish that I had a little bit more self-control and focused more on meals and less on snacks? Absolutely! But then I wouldn’t be able to eat these insanely good granola bars, or these Whole Wheat Muffins packed with protein, so maybe snacking is the way to go!

On Thursday when I headed to the supermarket the day before the big storm hit, I stocked up on the must haves—fruits, veggies, lots of milk, coconut flour, chips and salsa…

I got home, and was like yes, chips and salsa are fabulous, but if we want something hearty, healthy and filling when it’s time to find our cars under the snow, we need a little something else. Roberto and I really love a good granola bar, but sometimes they can be full of ingredients that no one has ever heard of, and that’s just a no go in this house!

Cue in these granola bars.

The base had to be oaty and nutty for me, always! From there, you can really add anything—spices, seeds, fruit, chocolate! The option of a nut flour is definitely there, but coconut flour adds a slight sweetness, so you can add little to no sugar in the rest of the bar. I love all types of dried fruit, and the dried cranberries can be swapped for something else. The crucial points in this bar? Oats, coconut flour, honey and peanut butter. It is best to use honey over agave or maple syrup because it has more of a viscous texture compared to the others and therefore will hold the bar together better. Almond flour and butter instead of coconut flour and peanut butter? Certainly—you can change that!

If I haven’t won you over so far, get ready for this. This recipe makes 8 bars. Each bar comes in at a delicious 225 calories, 13g of fat and 5g of protein! Tell me you aren’t grabbing your mixing bowl right now!

These granola bars are super healthy, full of great quality ingredients and will fuel all activities—from shoveling to stacking wood to all of your winter storm fun!

ingredients

Oats—1.5 oz, or ½ C

Coconut Flour—1.5 oz, or ¼ C

Pecans, chopped—2 oz, or ½ C

Dried Cranberries—1.5 oz, or ¼ C

Cayenne Pepper—¼ tsp

Cinnamon—½ tsp

Chia Seeds—0.2 oz, or 1 tsp

Salt—¼ tsp

Honey—2.5 oz, or ¼ C

Peanut Butter—3.25 oz, or 1/3C

Vanilla Extract—0.2 oz, or 1 tsp

Chocolate Chips—3 oz, or ¼ C + 1 TBL


process

Preheat your oven to 300˚ F.

In a bowl, combine the oats, flour, pecans, cranberries, cayenne pepper, cinnamon, chia seeds and salt. Mix.

In a heat proof bowl, combine the honey and peanut butter.

Heat in the microwave, or it can be over the stove in a pot, until the peanut butter is nice a melted. *I like to use crunchy peanut butter for this recipe, it gives the bars an added crunch factor—but creamy is fine too!*

Once melted, add in the vanilla extract, and pour all into the dry ingredients mixture.

Using either your hands or a spatula, mix until combined. Your granola mixture will feel slightly stiff, but that’s what you want!

Fold in the chocolate chips.

*You may add the chocolate chips in with the rest of the dry ingredients and mix with the melted peanut butter and honey. The end result in taste is the same, but the chips will melt, making your bars more a chocolate color!*

To bake, I use a square 8”x8” pan, line it with parchment and press the bars evenly into the pan.

Bake in your preheated oven for about 18-20 minutes, until the oats just start to brown.

*You could also freeze the bars instead of baking to hold their shape, but I love the crispy oat texture and taste!*

Remove from the oven and allow to cool.

Cut into bars—you will get 8 out of this pan, and they are only 225 calories each!


Bon Appétit!

Chocolate Coffee Cake with Maple Spiced Buttercream

New week, new recipe, New Year, new you!

This past week was the Russian Old New Year. One of my dearest friends who I have met in Charleston is from Russia, so of course this is something that she celebrates. My wonderful friend, Elena, invited Roberto and I, along with some of our other friends, over to celebrate with her and her boyfriend—and it was amazing! She told us all about the traditions, all about why it’s particularly special, and heck, I even ate dinner at 9:00, on a Wednesday night, wild, right?!

A few days before this big party, my friend asked us to all give her 13 fortunes that we hoped to happen this year, a few to be silly, but mostly things we really wished to come true this year for ourselves. Mine ranged from eat more avocado toast (hehe) to be your own boss to Patriot’s will win the Superbowl! She wrapped all of these little fortunes inside of foil, and then stuffed them into some insanely delicious onion and potato dumplings—140 to be exact, AND Elena made them all herself…

What her families tradition is, is that you each eat as many dumplings as you can, just so that you get oodles of fortunes!...I somehow managed 16 or 17 dumplings…

After, we would read each one aloud and then Elena would truly dissect what was to happen to us this year, and that we all were to have an incredibly happy and successful 2016!

Some of our friends’ were about travel, others about career change, and mine were about being surrounded by wonderful friends and family, good health, and just all around happiness—which is 100% what I went into this year saying. Crazy coincidence, no?!

With all of these positive vibes going around, all starting with a hilarious evening with some of the greatest and most unique friends, I decided that I wanted to treat myself, and Roberto, even more! While I may be a fulltime ice-cream maker, we are about 90% of the time extremely healthy folks. Green smoothies and yogurt for breakfast, salad, carrots and hummus, fruit slices for lunch, soups, fish, grains for dinner—I can’t say that I hate it! Yes, eating to healthfully fuel our bodies is such an amazing choice that we are so lucky to have, which is why I decided to ditch the apple and peanut butter dessert for some moist, decadent chocolate cake with just a hint of coffee and a smooth maple buttercream!

Small indulgences, right? That’s what I am all about for this New Year New You thing I’ve got going on!

What do I love about this cake? First off—chocolate. Secondly, the dark cocoa, the sour cream, the great quality coffee, all of these make for such a dense, rich, spoil-me cake, that the smallest of slices is enough to satisfy. Thirdly, this heavenly cake hardly needs a frosting, but there are some things I can’t help myself with, so a lightly flavored maple buttercream certainly goes a long way—definitely doesn’t overpower, but complements perfectly the hint of coffee in the cake.

So the question, what has this Russian Old New Year taught me in its first few days? Well, definitely not to eat 16 mouthwatering dumplings in one sitting, but also that with good health and happiness, you need to treat yourself as fabulously as you treat others—and if that means a slice of this absolutely divine cake, then enjoy each bite!

IMG_6225.JPG

cake ingredients

Flour—5 oz, or 1 C

Cocoa Powder—1.75 oz, or ½ C + 1 TBL

Baking Powder—½ tsp

Baking Soda—¼ tsp

Salt—½ tsp

Coffee Grounds—0.25 oz, or 1 TBL

Butter, room temperature—6 oz, or ¾ C

Brown Sugar—9.25 oz, or 1 ¼ C

Eggs—3

Vanilla—1 tsp

Cream—4 oz, or ½ C

Sour Cream—4 oz, or ½ C

Chocolate Chips—3 oz, or ½ C


process

Preheat the oven to 325˚ F.

In a bowl, sift together the flour, cocoa, baking powder, baking soda, and salt.

Add the coffee grounds.

In the bowl of your mixer, cream together the butter and sugar.

Add the eggs, one at a time, and the vanilla.

Beat until smooth.

Slowly add in half of your dry, sifted ingredients.

Once incorporated, scrape the sides of your bowl and add in the sour cream.

When fully mixed in, add in the second half of your dry ingredients.

Add in the cream.

When you have added in all of the ingredients and they are completely incorporated, fold in the chocolate chips.

Spray either a loaf pan or an 8” cake pan with nonstick spray and line with parchment paper.

Pour your batter into the prepared pan and bake for 55-60 minutes, until the cake springs back when you touch it.

Allow to cool completely on a cooling rack before frosting it!


frosting ingredients

Butter, room temperature—4 oz, or ½ C, or 1 stick

Confectioner’s Sugar—5.25 oz, or 1 C

Maple Syrup—0.75 oz, or 2 tsp

Cream—0.75 oz, or 4 tsp

Cinnamon—½ tsp


process

In the bowl of your mixer, cream the butter until smooth.

Slowly add in the sifted confectioner’s sugar.

Once the butter and sugar have become very smooth, scrape down the sides of the bowl.

With the mixer in low, slowly stream in the maple syrup and cream.

Add in the cinnamon.

Cream until smooth.

Now this is ready to frost your cooled cake! You may either do the entire top, or give everyone a dollop on their own slice.


Bon Appétit!

Ginger Spice Cookies

          Happy November! Now that Halloween is over, the true holiday season is upon us! Why yes, I may begin to watch Elf soon (don’t tell Roberto), and humming some tunes that are only appropriate for next month may occur while I prepare my Thanksgiving dessert menu, but I just cannot help it. While I absolutely adore fall and all that it has to offer, November 1st-December 26th has me in a rather nonstop giddy state. Who knows, maybe there is just 100x the normal amount of love in the air, or maybe I am just super excited for Peppermint Mocha season (sorry, PSL, you no longer win!), but as of November 1st, general happiness is at an all time high!

            So, of course, I had to bake a staple in the winter diet—ginger cookies. Growing up, my grandparents would always have a huge box of these in their house, and I would, not so sneakily, eat handfuls at a time. I used to just let them soak in milk or hot chocolate, get super mushy, and then eat them, about 10 in a sitting, before possibly going back for more. Wow, sugar obsessed much? Not ashamed!

            As I now feel as though it is acceptable for me to purchase these forever favorite ginger snaps, I thought it would be even better to make my own version, so I don’t have to go back to the supermarket every other day to shamefully buy another box! With my addition of candied ginger, the spiciness of this cookie multiplies, and at the same time, brings the sweetness level down—this allows you to eat more of these, guilt free because your mouth isn’t screaming at you for a sugar overload! Best part of my ginger spice cookies? When you roll them in sugar and bake them, they form a nice, crisp outer shell, but leaving the insides soft and chewy, the most amazing combination of textures.

            It’s a good thing that I am feeling extra full of love these days because, as much as I am obsessed with these cookies, my fiancé is even more! So go and take your cheery self into the kitchen, maybe put on a pair of favorite socks that happen to have reindeer on them, or your coziest snowflake sweater, and get to baking!

IMG_5631.JPG

ingredients

Butter—6 oz, or 12 TBL

Brown Sugar—8 oz, or 1 ¼ C

Eggs—1

Molasses—2.75 oz, or ¼ C

Flour—12.5 oz, or 2 ½ C

Baking Soda—0.1 oz, or ½ tsp

Salt—0.05 oz, or ¼ tsp

Ground Ginger—0.15 oz, or 2 tsp

Candied Ginger (cut into small pieces)—0.75 oz, or 1 TBL

Allspice—0.1 oz, or ½ tsp

Black Pepper—0.1 oz, or ½ tsp

Sugar—as needed to roll dough in


process

In the bowl of your mixer, cream together the butter and brown sugar.

Once smooth, add in your egg and molasses. Mix until combined.

Sift together all of your dry ingredients and then slowly add to your creamed mixture.

Once the dough has formed, add in your chopped candied ginger.

Transfer your cookie dough either into another bowl or wrap it in plastic, allow it to firm up in the refrigerator for about an hour.

When you are ready to bake your cookies, preheat your oven to 350˚ F.

Form your cookie dough into whatever sized balls you would like, 2 oz is the perfect cookie size to me!

Roll them in sugar and then put on a sheet pan that has been sprayed with nonstick spray.

Press down slightly.

Put into your preheated oven and bake for 12-15 minutes.

Remove from the pan and allow to cool slightly before eating.


Bon Appétit!